On-screen gamepad controller for Flame
Imagine a game that doesn’t allow the players to decide, choose, or control something. If you’re having trouble thinking of a game that matches that description, it’s because all games allow the player to control it.
It wouldn’t be a game without any input from the player.
This is the same for all games on all platforms with different hardware interfaces. Even for games on mobile devices that only have one main way of input.
If you grew up during the ’90s, you have probably played games on consoles that you plug into a TV. These game consoles have controllers that allow you to control the game.
Different brands offer different layouts and optional features for these controllers. But a simple pattern exists. Even though there are exceptions when it comes to specialized controllers, this pattern has become the standard across all brands even modern versions of this day.
The pattern has the following simple rules:
- Directions (up, down, left, and right)
- Four or more (or less) action buttons
This intro is becoming very long so to cut it short: in this tutorial, we’ll try to make a simple mobile game using Flame and Flutter and top it off with an on-screen game controller.
All the code in this tutorial can be found on this GitHub repository.
Create the game
To make things easier, let’s start a game from scratch. But with a little modification on the widget tree and the integration part, you can apply the concept in this tutorial if you already have a game.
Let’s call our new game Lame Tank. Because why not?
You can choose any other name, just replace the parts that say “lame tank” with the one you choose.
If you already have a game and just want the UI and integration, skip on over to Add the controller UI section.
The usual Flutter app creation
Let’s start by opening up a terminal and navigating to a directory where you keep your projects.
Then in the terminal type the flutter create command like so:
$ flutter create lame_tank
Bash
Let it run to do its thing and after a few seconds, the project should be ready. At this point, you can already run the game by typing the following command in the terminal.
$ flutter run
Bash
Make sure you have a phone connected to your computer or an emulator running.
Game setup
It’s time to convert this app into a game. To do this we’ll use Flame.
Open the project folder in your favorite IDE or text editor. I use Visual Studio Code but you can use whatever works for you.
Go to the ./pubspec.yaml (it should be in the root of your project folder) file and open it. Add flame as a dependency by listing it under the dependencies section and specifying the latest version (0.15.1 as of writing).
dependencies:
  flutter:
    sdk: flutter
  flame: ^0.15.1
Next, let’s make sure that we’re running on full screen and landscape mode only. Open ./lib/main.dart and import Flutter’s services library by inserting the following line at the top of the file.
import 'package:flutter/services.dart';
Then look for this line (which should be near the top):
void main() => runApp(MyApp());
And convert it into an asynchronous multi-line function definition.
void main() async {
  // set preferred orientations (landscape only)
  await SystemChrome.setPreferredOrientations([
    DeviceOrientation.landscapeLeft,
    DeviceOrientation.landscapeRight,
  ]);

  // disable all UI overlays (show fullscreen)
  await SystemChrome.setEnabledSystemUIOverlays([]);

  runApp(MyApp());
}
The async keyword converts the function into an asynchronous function and allows you to use the await keyword. The await keyword “waits” for the function that follows it to finish executing (in a non-blocking way) before letting the code run the next line.
Then delete everything below this function.
The whole ./lib/main.dart file should now look like this:
import 'package:flutter/material.dart';
import 'package:flutter/services.dart';

void main() async {
  // set preferred orientations (landscape only)
  await SystemChrome.setPreferredOrientations([
    DeviceOrientation.landscapeLeft,
    DeviceOrientation.landscapeRight,
  ]);

  // disable all UI overlays (show fullscreen)
  await SystemChrome.setEnabledSystemUIOverlays([]);

  runApp(MyApp());
}
If you’re using an IDE like Android Studio or an advanced text/code editor like Visual Studio Code, you will see that the runApp(MyApp()); line is underlined or highlighted as an error. This is because we’ve deleted the MyApp class. Don’t worry we’ll fix this in the next section.
The game class
It’s time to create an instance of a Flame game. Let’s create a separate file for this in ./lib/lame-tank.dart and start with the following code.
import 'dart:ui';
import 'package:flame/game.dart';

class LameTank extends Game {
  Size screenSize;

  void render(Canvas c) {}

  void update(double t) {}

  void resize(Size size) {
    screenSize = size;
  }
}
The resize handler function just assigns whatever Size value is passed to it into the screenSize variable.
Let’s connect this with the runApp call from ./lib/main.dart by importing the class file:
import 'package:lame_tank/lame-tank.dart';
And creating a new instance and feeding its .widget property to runApp:
runApp(LameTank().widget);
Before we do a test run, let’s modify the LameTank class so it draws a flat background color. Jump back to ./lib/lame-tank.dart and inside the render function draw a background color.
void render(Canvas c) {
  if (screenSize == null) {
    return;
  }

  c.drawRect(
    Rect.fromLTWH(
      0,
      0,
      screenSize.width,
      screenSize.height,
    ),
    Paint()..color = Color(0xff27ae60),
  );
}
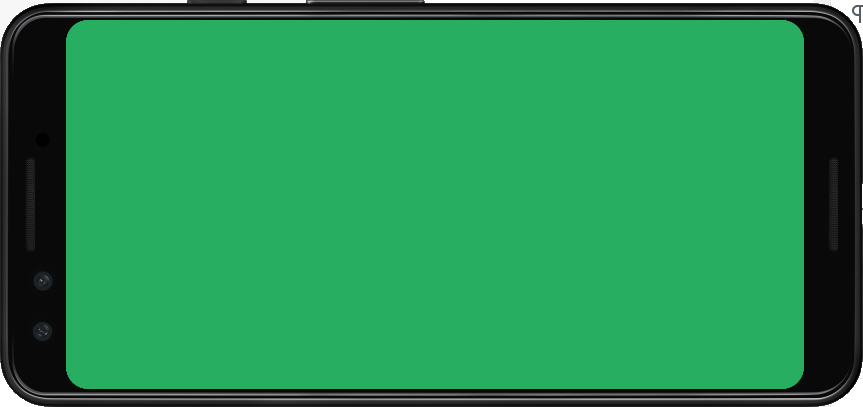
The render function first checks if screenSize is set, if not it immediately returns. If there’s a value in screenSize it draws a Rectangle that’s the same size as the screen using a color with the code #27ae60.
Time to run the game.
You should see a full a fullscreen “field of grass” on the device you’re testing the game on.
Add a “character”
Our game needs a character that we can control. So before we build the controller UI, let’s make sure we have a game to control.
Just another tank
For this game, our main “character” would be a tank. It can shoot bullets at the direction it’s currently facing.
Let’s start by creating a file in ./lib/components/tank.dart and have the following initial code in it.
import 'dart:ui';
import 'package:lame_tank/lame-tank.dart';

class Tank {
  final LameTank game;
  Offset position = Offset.zero;

  Tank(this.game, {this.position});

  void render(Canvas c) {
    // prepare some paint objects
    Paint lightPaint = Paint()..color = Color(0xffdddddd);
    Paint darkPaint = Paint()..color = Color(0xff777777);

    // set the canvas origin onto the tank position
    c.save();
    c.translate(position.dx, position.dy);

    // draw tank body
    c.drawRect(
      Rect.fromLTWH(-15, -20, 30, 40),
      lightPaint,
    );

    // draw wheels
    c.drawRect(
      Rect.fromLTWH(-23, -24, 8, 48),
      darkPaint,
    );
    c.drawRect(
      Rect.fromLTWH(15, -24, 8, 48),
      darkPaint,
    );

    // draw turret
    c.drawRect(
      Rect.fromLTWH(-12, -15, 24, 25),
      darkPaint,
    );
    c.drawRect(
      Rect.fromLTWH(-3, -36, 6, 36),
      darkPaint,
    );
    c.drawRect(
      Rect.fromLTWH(-5, -42, 10, 6),
      darkPaint,
    );

    c.restore();
  }
}
The game variable is a reference to the running LameTank instance. This is here so we can access the game’s variables (like screenSize) if we need to.
Inside the render function, we draw a bunch of rectangles using either of the prepared darkPaint or lightPaint objects to draw “a tank”.
Next, we need to add this tank into our game class to include it in the game loop. Go back to ./lib/lame-tank.dart and import the tank class file and add a variable that will hold the tank:
import 'package:lame_tank/components/tank.dart';
Tank tank;
Then, inside the resize function, we’ll sneakily initialize the tank variable if it’s not already initialized.
if (tank == null) {
  tank = Tank(
    this,
    position: Offset(
      screenSize.width / 2,
      screenSize.height / 2,
    ),
  );
}
Put this just below the screenSize = size; line to make sure screenSize has a value and is ready to be used.
The resize function can be called multiple times during gameplay if the screen is re-oriented. Other phones also support different resolutions that you can change while in-game. This is the reason why we check first if the tank is not yet initialized, only then we create a new instance of the tank.
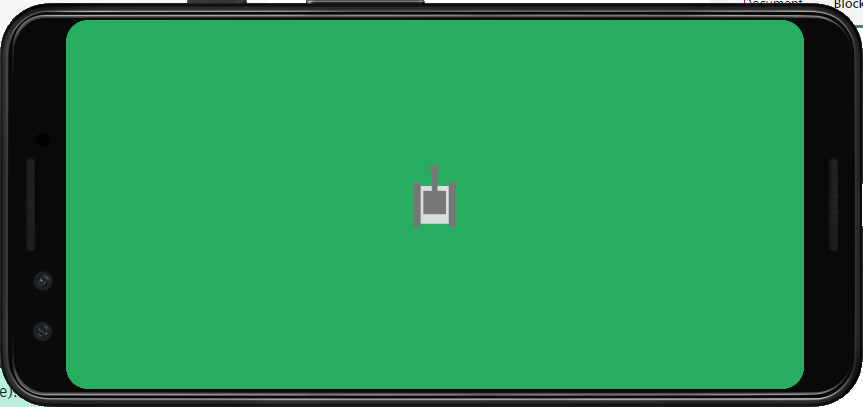
Let’s make sure that the tank is rendered by calling its render function from within the game class’ render function.
// draw the tank
tank.render(c);
Like most things in a computer, rendering happens sequentially. Things will get rendered in the order that you write them. In order to make sure that the tank is on top (in front) of the field of grass, draw the tank after drawing the field of grass.
The game should now have a tank in the middle of the screen.
Defining directions
Most top-down shooter games support a full 360° of rotation, but for simplicity’s sake, we’ll just support four directions: up, right, down, and left.
For data that can hold only a handful of values, enums are best. So let’s create a file in ./lib/helpers/directions.dart and put in the following code.
enum Direction {
  up,
  right,
  down,
  left,
}
It’s that simple, we just defined a new data type called Direction via an enum definition. We then list all possible values for this data type.
Transforming the canvas
To support rotation, we can recalculate our rectangle values so the rendered tank looks like it’s facing a different direction.
But that’s too much work!
Let’s rotate the canvas instead. So in preparation, let’s jump back to the tank class file (./lib/components/tank.dart) import the directions helper and add a variable that will hold the direction of the tank.
import 'package:lame_tank/helpers/directions.dart';
Direction direction = Direction.up;
We initialize the direction variable to have a value of Direction.up since our tank is drawn facing up by default.
After that, let’s import the math package so we can use the variable pi.
import 'dart:math';
Then, let’s go to the resize function. Right after the c.translate(...) line, add the following block of code.
// rotate the canvas
switch (direction) {
  case Direction.up:
    c.rotate(0);
    break;
  case Direction.right:
    c.rotate(pi / 2);
    break;
  case Direction.down:
    c.rotate(pi);
    break;
  case Direction.left:
    c.rotate(pi * 3 / 2);
    break;
}
In this block, we rotate the canvas based on what the direction of the tank is. pi / 2 is a rotation that is a quarter of a full rotation (90° for you mathematicians out there). So up has no rotation, right has a quarter, down has half, and left has three quarters.
Try changing the initial value of the tank’s direction variable and reset the game. You should see the tank properly facing the direction you specified.
Before moving on to bullets, let’s add one more function in the Tank class that will return an Offset where the bullet should initially be when one is shot out of the tank.
Offset getBulletOffset() {
  switch (direction) {
    case Direction.up:
      return position.translate(0, -52);
      break;
    case Direction.right:
      return position.translate(52, 0);
      break;
    case Direction.down:
      return position.translate(0, 52);
      break;
    case Direction.left:
      return position.translate(-52, 0);
      break;
  }
  return Offset.zero;
}
The tank’s barrel’s length is exactly 52. So depending on the direction of the tank, we return an Offset that is 52 units away from the position of the tank. If for some reason the direction holds a value other than the four enum-allowed values, we just put the bullet at the center of the tank.
Shooting bullets
At this point, we have a field of grass and a tank in the middle. Pretty pointless so far. Let’s make it possible to shoot bullets out of this tank.
The bullet class
Create a new class file in ./lib/components/bullet.dart:
import 'dart:ui';
import 'package:lame_tank/lame-tank.dart';

class Bullet {
  final LameTank game;
  final double speed = 300;
  Offset position;

  Bullet(this.game, {this.position});

  void render(Canvas c) {
    c.save();
    c.translate(position.dx, position.dy);

    c.drawRect(
      Rect.fromLTWH(-3, -6, 6, 16),
      Paint()..color = Color(0xffff0000),
    );

    c.restore();
  }

  void update(double t) {}
}
The above code is just a regular component class with render and update methods. On creation, it requires a game class instance and accepts an optional position value (just like the tank). One other thing is we define a speed constant that is set to 300.
For the visual aspect, the bullet is just a red rectangle centered on the value of position.
Directions and canvas transform
To allow for rotation, we need to import the math package and the directions helper we created earlier.
import 'dart:math';
import 'package:lame_tank/helpers/directions.dart';
Then, add a direction variable and optionally accept a value in the constructor.
Direction direction = Direction.up;
Bullet(this.game, {this.position, this.direction});
Inside the render function (just below the c.translate(...) line), add the following block to rotate the bullet depending on the value of its direction variable.
// rotate the canvas
switch (direction) {
  case Direction.up:
    c.rotate(0);
    break;
  case Direction.right:
    c.rotate(pi / 2);
    break;
  case Direction.down:
    c.rotate(pi);
    break;
  case Direction.left:
    c.rotate(pi * 3 / 2);
    break;
}
This code is exactly the same and functions the same as the one in the Tank class so feel free to copy from there.
Let’s quickly jump to **./lib/lame-tank.dart** to shoot out a bullet from the tank on creation. Start by importing the bullet class file.
import 'package:lame_tank/components/bullet.dart';
We might have multiple bullets on the screen at any given time so let’s store the bullets in a List instead of just a regular variable.
List bullets;
Let’s add a function that when called, shoots out a bullet from the end of the tank’s barrel. Let’s name this function shoot.
void shoot() {
  bullets.add(
    Bullet(
      this,
      position: tank.getBulletOffset(),
      direction: tank.direction,
    ),
  );
}
Remember the getBulletOffset function we created in the tank class? We’re using it here so we can pass the proper position value when shooting out a new bullet. We’re also copying the direction of the tank and passing into the new bullet.
Then we pass the new bullet into the add method of the bullets list.
Inside the resize function, add the following block of code after initializing the tank.
if (bullets == null) {
  bullets = List();
  shoot();
}
This code checks if the bullets list is not yet initialized and initializes it with a new instance of a List of Bullets.
We call the shoot function after the initialization to test out how the bullet looks like on screen.
If you do a test run of the game, there should be a bullet coming out of the barrel.
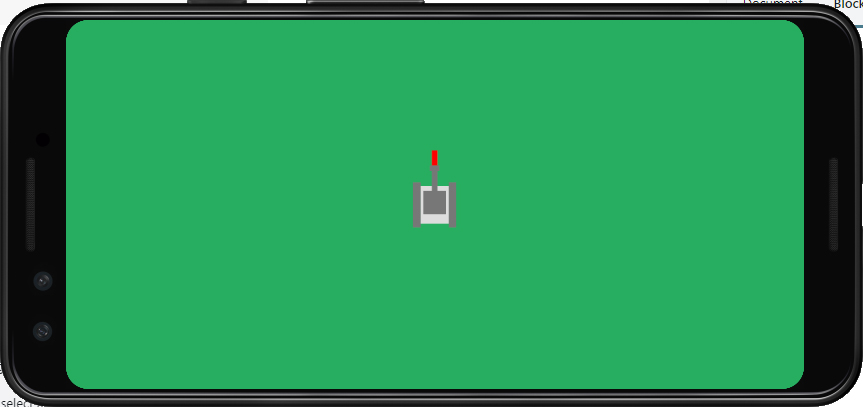
Flying bullets and garbage collection
Bullets are supposed to fly straight off of a tank’s barrel. For this, we need to have code that will alter the value of position.
We also need some sort of garbage collection mechanism. Once a bullet goes off-screen, it needs to be destroyed since they are no longer of any use. Destroying off-screen bullets will do the following:
- Free up the memory that holds the bullet
- Free up the CPU from calculating the bullet’s position
So let’s go back to the bullet class file (./lib/components/bullet.dart) and add a boolean variable will declare that this bullet is already off-screen (false by default).
bool isOffscreen = false;
Then update the “update” function to “update” the position every time it is called.
void update(double t) {
  if (isOffscreen) {
    return;
  }

  switch (direction) {
    case Direction.up:
      position = position.translate(0, -speed * t);
      if (position.dy < -50) {
        isOffscreen = true;
      }
      break;
    case Direction.right:
      position = position.translate(speed * t, 0);
      if (position.dx > game.screenSize.width + 50) {
        isOffscreen = true;
      }
      break;
    case Direction.down:
      position = position.translate(0, speed * t);
      if (position.dy > game.screenSize.height + 50) {
        isOffscreen = true;
      }
      break;
    case Direction.left:
      position = position.translate(-speed * t, 0);
      if (position.dx < -50) {
        isOffscreen = true;
      }
      break;
  }
}
The first thing update does is check if this bullet is already off-screen. If it is, just return and end this function's execution.
For the rest of the code, let's just focus on one case but the same happens for all direction cases with a difference only on the changed and checked coordinates. The position is translated by the value of speed multiplied by the t value. The values passed for x and y depend on the direction.
The t variable is the amount of time since the game loop last called the update function. This is helpful in making animations and movements rely on time rather than a fixed value, in turn making them smooth. To learn more about the game loop, check out my game development tutorial for beginners.
After translating the position, a check is done if the bullet is already outside the bounds of the screen. Set isOffscreen to true if it's true.
We're almost done with the simple game. We just need to open ./lib/lame-tank.dart and call all bullets' update function from the game class' update function.
void update(double t) {
  if (screenSize == null) {
    return;
  }

  // make bullets fly
  bullets.forEach((Bullet b) {
    b.update(t);
  });

  // remove off-screen bullets
  bullets.removeWhere((Bullet b) {
    return b.isOffscreen;
  });
}
The first thing that happens is a check if screenSize is initialized and just return to end execution if it's not.
If there's a screenSize the execution continues. It cycles through all bullets in the bullets list and calls the update function on each of them.
After updating, the game removes all bullets that are marked as off-screen to avoid a memory leak and to keep performance to the highest possible level.
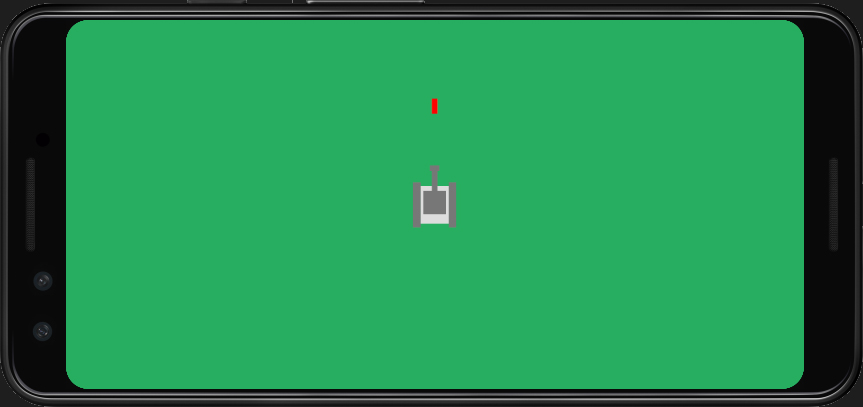
The game is now ready, run it and you should see that the bullet now flies off the screen.
Add the controller UI
So far we have a game that we can't control. The next logical step is to fix this problem.
Let's build a controller for our game.
We can build the game controller UI (the buttons) by creating component classes for the buttons and rendering them manually using Flame functions like what we did with the field of grass, the tank, and the bullet.
But let's not forget that even though we're building our game mainly with Flame, our game is still a Flutter application. All Flutter apps run on Widgets. A widget is a single building block of an app.
Widgets are added to the widget tree. With proper arrangement and planning, Flutter makes UI building easy.
In our game's case, the widget we're using is a "Flame Game" widget. We pass it directly to runApp so that makes our Flame game widget the root widget of the widget tree.
There's a whole lot more to it if we really want to talk about widgets. We're barely scratching the minimum here so we can build our game controller. Learn more by visiting the Flutter site.
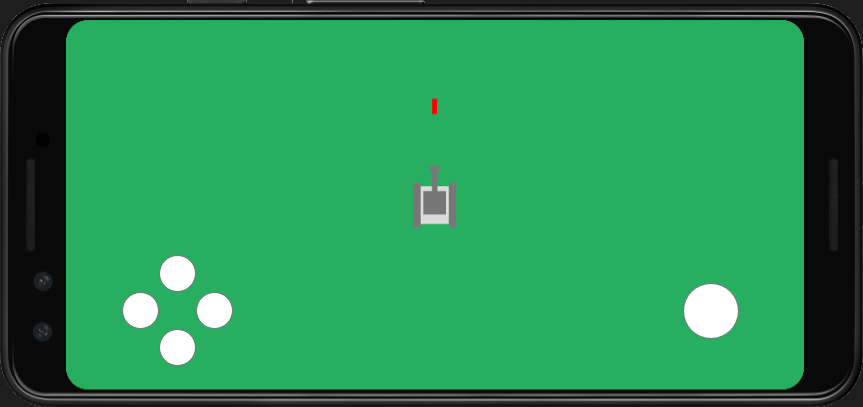
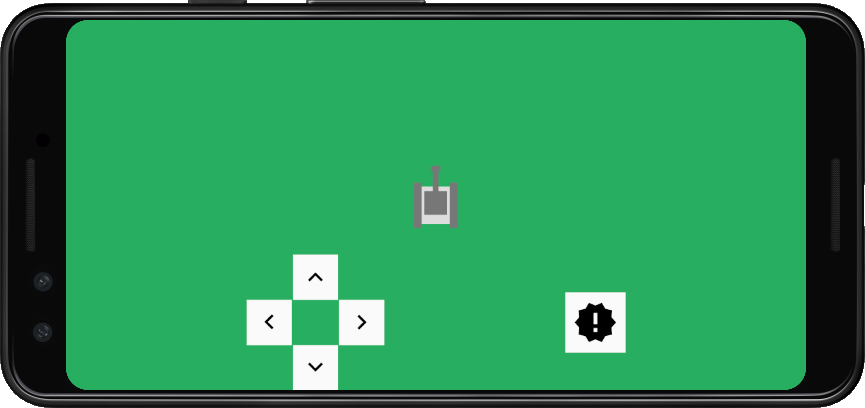
This is a mockup that shows roughly how we want our controller to look like.
Stack 'em up
To have the controller appear on top of our game (but in the same space), we'll use a clever little widget called a Stack.
The Stack widget allows multiple widgets to be rendered on top of one another like a stack of paper. But in this case, we'll stack the UI "layer" on top of the game layer.
It would be useless, of course, if the front-most widget is fully opaque. Luckily, widgets can be mostly transparent, only rending objects in certain locations. Very much like a frame on top of a picture.

Open ./lib/main.dart and replace the line that says:
runApp(LameTank().widget);
With the following block of code:
runApp(
  Directionality(
    textDirection: TextDirection.ltr,
    child: Stack(
      children: [
        LameTank().widget,
        // controller here
      ],
    ),
  ),
);
You might notice that instead of feeding runApp with a Stack widget, we put in Directionality instead as the root widget. This is because a Stack widget, for some reason, requires a defined "directionality". We just pass TextDirection.ltr since it's the more common text direction and that it doesn't really matter for now.
After that, we put a Stack widget as the child of the Directionality widget. Some widgets accept a child while others, like Stack accepts multiple children. Stack needs children to "stack" together as it would be pointless to stack just one child, for that we can use a Container widget.
For the Stack widget's children, we pass in the Flame game widget (which used to be the root widget) and a placeholder line which we will fill next.
Instead of directly creating the whole game controller widget tree into ./lib/main.dart, let us create a GameController class instead.
Create a file in ./lib/game-controller.dart and add the following code.
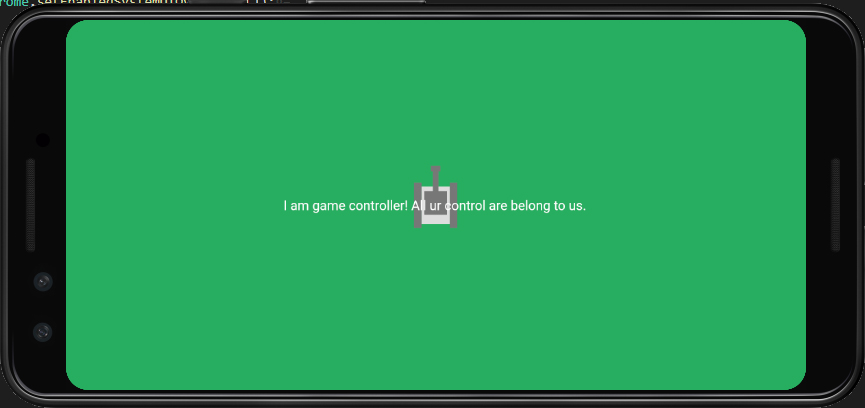
import 'package:flutter/material.dart';

class GameController extends StatelessWidget {
  Widget build(BuildContext context) {
    return Container(
      child: Center(
        child: Text('I am game controller! All ur control are belong to us.'),
      ),
    );
  }
}
When creating new widgets, Flutter requires a build function that returns other widgets. In this case, we return a Container widget that has a Center widget as a child. The Center widget "centers" its child widget which is a Text widget.
Before we build the actual game controller layout and buttons, let's link this widget into ./lib/main.dart first by importing it and replacing the placeholder comment with a new instance of GameController.
import 'package:lame_tank/game-controller.dart';
child: Stack(
  children: [
    LameTank().widget,
    GameController(),
  ],
),
Try to run the game and you should now see a Text that is Centered inside a Container that is the same size as the screen.
Layout with Flutter widgets
Remember the mockup we have for the gamepad? Flutter provides us with a lot of layout options but what I find the easiest is just combining Rows and Columns.
Ignoring the field of grass, the tank, and the bullet, the image above shows us that there's a group of buttons in the lower left and in the lower right parts of the screen.
Even with simple rows and columns, there are many ways (combinations) that we can divide this mockup to get the layout we want.
But again, let's take the simplest path by taking out the huge chunk of empty space up top.

I see two boxes stacked on top of each other. Now it's clear that we should have a Column.
Open ./lib/game-controller.dart and delete the build function. In its place, type the following code:
Widget build(BuildContext context) {
  return Column(
    crossAxisAlignment: CrossAxisAlignment.stretch,
    children: [
      Spacer(),
      // bottom row
    ],
  );
}
As you can see, we return a Column that will fill the entire screen. We set it's crossAxisAlignment property to CrossAxisAlignment.stretch to stretch out its children in the left-to-right direction (the main axis is up-and-down). Then for the children, we have a Spacer that represents the empty space above and a placeholder line for the bottom part.
The bottom part is next. Breaking it down should look like this.
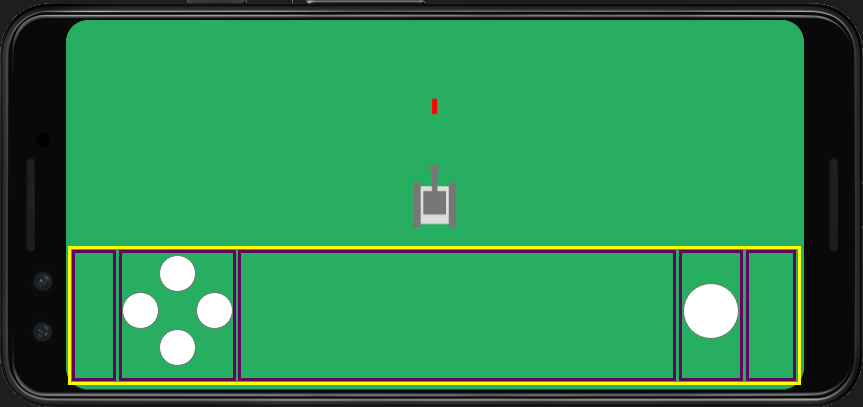
That's five purple boxes in a Row! Let's add these boxes into our code so the build function now looks like this:
Widget build(BuildContext context) {
  return Column(
    crossAxisAlignment: CrossAxisAlignment.stretch,
    children: [
      Spacer(), // big empty space up top
      // the bottom part
      Row(
        children: [
          Spacer(), // left of directional buttons
          Container(), // the directional buttons
          Spacer(), // big empty space in the middle
          Container(), // the fire button
          Spacer(), // right of the fire button
        ],
      ),
    ],
  );
}
Breaking down the UI further, let's focus on the directional buttons themselves.
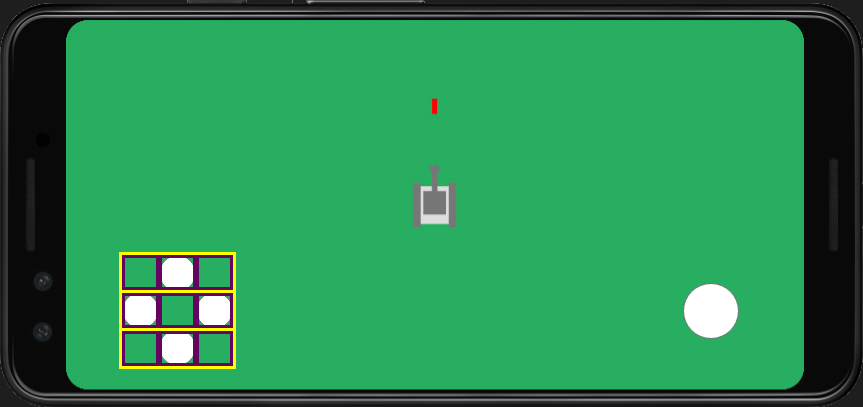
I see three Rows (yellow) with three children (purple) stacked on top of each other inside a Column.
Writing it as code in the widget tree, it looks like this (by replacing Container in "the directional buttons" line).
Column(
  mainAxisSize: MainAxisSize.min,
  children: [
    Row(
      children: [
        SizedBox(width: 50),
        // up button
        SizedBox(width: 50),
      ],
    ),
    Row(
      children: [
        // left button
        SizedBox(width: 50),
        // right button
      ],
    ),
    Row(
      children: [
        SizedBox(width: 50),
        // down button
        SizedBox(width: 50),
      ],
    ),
  ],
),
As can be seen in the code above, the directional buttons section has been replaced with a Column that has three Rows as its children. The first (top) row is composed of (from left to right): a spacer in the form of a SizedBox that is 50 units wide, a placeholder for the up button, and another spacer that is 50 units wide. The second (middle) row is composed of: a placeholder for the left button, a spacer, and a placeholder for the right button. The last (bottom) row is the same as the first one but contains a placeholder for the down button instead of up.
The value 50 is arbitrary, you can play around with this number if you want to customize the spacing of the buttons further.
For the fire button, we just have to make sure that the button is centered on its container box. Replace the fire button Container with the following:
Center(
  child: Container(),
),
The Container widget is just a placeholder and will be replaced by the actual button widget in the next section.
Buttons
For the buttons, we will be using an awesome widget that detects gestures called the GestureDetector.
Replace all placeholders for buttons with the following code:
GestureDetector(
  child: Container(
    height: 48,
    width: 48,
    color: Color(0xffffffff),
    child: Center(
      child: Icon(Icons.keyboard_arrow_down, size: 32),
    ),
  ),
  onPanDown: (DragDownDetails d) {},
  onPanEnd: (DragEndDetails d) {},
),
The GestureDetector widget accepts a child as its visual aspect and some handlers that will run based on what gestures the widget receives. The height and width can be adjusted to suit your preferences. The value for the onPanDown and onPanEnd are just empty functions that we will fill later when the game is ready to accept input.
Make sure to replace the icon value with the proper direction values (Icons.keyboard_arrow_right, Icons.keyboard_arrow_down, and Icons.keyboard_arrow_left).
The value 32 for the icon size can also be modified to suit your preferences on how big a button should be.
For the fire button, the whole section would look like this.
// the fire button
Center(
  child: GestureDetector(
    child: Container(
      height: 64,
      width: 64,
      color: Color(0xffffffff),
      child: Center(
        child: Icon(Icons.new_releases, size: 48),
      ),
    ),
    onTap: () {},
  ),
),
The icon size for this button is 48 so it's a little bit bigger than the directional buttons. The icon Icons.new_releases looks like an explosion with an exclamation symbol but you can choose any from the Material Icons collection.
We use the onTap handler for the fire button since the tank will have a fire once on tap mode.
Run the game and even though it might be a little different due to screen size and resolution, you should something that looks like this.
Finalize layout
There are two main issues with this current layout:
- The buttons are stuck to the bottom edge of the screen
- There's too much space to the left and right of the buttons
To fix the first issue, we'll just add a SizedBox as a last child of the outer Column.
Widget build(BuildContext context) {
  return Column(
    crossAxisAlignment: CrossAxisAlignment.stretch,
    children: [
      // big empty space
      Spacer(),

      // the bottom part
      Row(
        // code hidden because it's too long
      ),

      // bottom spacer
      SizedBox(height: 18),
    ],
  );
}
The bottom part will now have space that is about 18 units thick. You can also experiment with this value to suit your preferred position of buttons.
The second issue is caused by the type of spacer widget we use on both the left and right sides. The spacer widget we're currently using is the Spacer widget. It takes up as much space it can but shares it with other spacers. That's why the empty space is evenly distributed into the left, middle, and right sections.
To fix this, we need to replace both the spacer to the left and right with a SizedBox with a specified width.
// spacer to the left of directional buttons
SizedBox(width: 48),
// right of the fire button
SizedBox(width: 48),
Like the above spacing values, the 48 here can be modified to the preferred spacing width.
Let's run the game now to check. Your version may vary due to different screen size, screen resolution, and spacing values but should generally look the same.
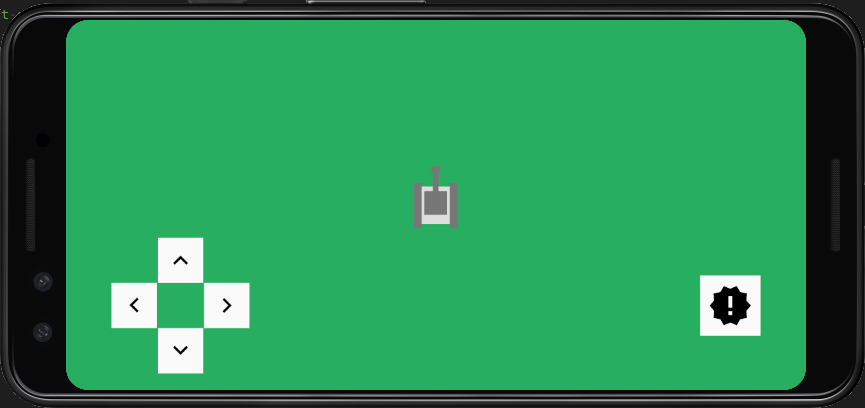
That's more like it!
Connect the controller functions
The game controller UI and the game widget, although stacked on top of each other, are two separate entities right now. We need to add a way to connect the interaction from the game controller into the Flame game below it.
Connecting the game
Let's deal with the connection first. The game controller should have access to the game class. We'll do this the same way components have access to the game class.
Import the game class file and add a variable that will hold the game class' instance.
import 'package:lame_tank/lame-tank.dart';
final LameTank game;
Then in the constructor, require an instance of the game class to be passed.
const GameController({Key key, @required this.game}) : super(key: key);
After that, modify the main function in ./lib/main.dart so that it creates an instance of the game class first before calling runApp. That way we can pass the reference to both the Stack as a child and the game UI.
// initialize a game first
final LameTank game = LameTank();

// run the app
runApp(
  Directionality(
    textDirection: TextDirection.ltr,
    child: Stack(
      children: [
        game.widget,
        GameController(game: game),
      ],
    ),
  ),
);
Preparing the handlers
Open the game class (./lib/lame-tank.dart), import the gestures library, and add the following event handler functions.
import 'package:flutter/gestures.dart';
The gestures library allows this file to access classes like DragDownDetails and DragEndDetails that are required parameters when writing handlers for certain gestures.
void onUpDragStart(DragDownDetails d) {}

void onUpDragEnd(DragEndDetails d) {}

void onRightDragStart(DragDownDetails d) {}

void onRightDragEnd(DragEndDetails d) {}

void onDownDragStart(DragDownDetails d) {}

void onDownDragEnd(DragEndDetails d) {}

void onLeftDragStart(DragDownDetails d) {}

void onLeftDragEnd(DragEndDetails d) {}

void onFireTap() {}
Then in the game controller (./lib/game-controller.dart), replace the values of the handler parameters of the GestureDetector widgets.
The following block is for the up button. Make sure to match the names of the handler with the button you're attaching it to.
// up button
GestureDetector(
  child: Container(
    height: 48,
    width: 48,
    color: Color(0xffffffff),
    child: Center(
      child: Icon(Icons.keyboard_arrow_up, size: 32),
    ),
  ),
  onPanDown: game.onUpDragStart,
  onPanEnd: game.onUpDragEnd,
),
The following are the relevant lines for left, right, and down buttons:
onPanDown: game.onLeftDragStart,
onPanEnd: game.onLeftDragEnd,
onPanDown: game.onRightDragStart,
onPanEnd: game.onRightDragEnd,
onPanDown: game.onDownDragStart,
onPanEnd: game.onDownDragEnd,
The fire button's handler is a little different as it only contains the onTap handler.
// the fire button
Center(
  child: GestureDetector(
    child: Container(
      height: 64,
      width: 64,
      color: Color(0xffffffff),
      child: Center(
        child: Icon(Icons.new_releases, size: 48),
      ),
    ),
    onTap: game.onFireTap,
  ),
),
We're now ready to move on to the next part which is making the code react to the gestures detected by the buttons.
Make the tank move
Let me state a little explanation first. Because the directional buttons can be pressed down all at the same time, we need to have some sort of priority mechanism written into the code.
The first part of this priority mechanism is "opposites".
If the player presses the left and right buttons at the same time, what should happen? Nothing. Nothing should happen, because the character (tank) is going to the left at the same rate that it's going to the right. Therefore it's not moving.
We do this in code by setting a variable called xMovement. This variable has an initial value of zero. Once the left button is tapped down, we subtract 1 from the xMovement variable making its value -1. Once the left button is released we add 1 to xMovement resetting its value back to 0 (-1 + 1 = 0). For it's opposite, the right button, we add 1 on press then we subtract 1 on release.
If the player presses and holds the left button (-1) then simultaneously presses and holds the right button (+1) the total value of xMovement will become zero (-1 + 1 = 0), hence no movement.
The same applies for the up and down buttons too but with a variable called yMovement where up is -1 and down is +1.
The second part of the priority mechanism is "adjacents".
Adjacents happen when buttons of the following combinations are pressed at the same time:
- up and left
- up and right
- down and left
- down and right
A player would expect that the tank moves diagonally when this happens, but we only support four directions of movement.
To mitigate this issue we add another variable called lastMove which is a String that initially contains an empty string. It could contain the string values x and y.
This is another scenario where an enum would be ideal. I'll just leave this as a String to show other possibilities for our friends out there that are just beginning to understand the concepts of programming and game development.
You could challenge yourself though by converting creating an enum for this variable and substitute the following code blocks with code that is appropriate for your enum data type. Good luck, have fun, and remember: it's okay to ask for help.
When either the left or right buttons are pressed, we set lastMove to x. If either up or down buttons are pressed we assign y instead.
Alright, let's code it up!
Open ./lib/lame-tank.dart and import the Directions data type file we created earlier and add the three variables discussed above.
import 'package:lame_tank/helpers/directions.dart';
String lastMove = '';
double yMovement = 0;
double xMovement = 0;
Next, we add code inside the handler functions according to what's described above.
void onUpDragStart(DragDownDetails d) {
  yMovement += -1;
  lastMove = 'y';
}

void onUpDragEnd(DragEndDetails d) {
  yMovement += 1;
}

void onRightDragStart(DragDownDetails d) {
  xMovement += 1;
  lastMove = 'x';
}

void onRightDragEnd(DragEndDetails d) {
  xMovement += -1;
}

void onDownDragStart(DragDownDetails d) {
  yMovement += 1;
  lastMove = 'y';
}

void onDownDragEnd(DragEndDetails d) {
  yMovement += -1;
}

void onLeftDragStart(DragDownDetails d) {
  xMovement += -1;
  lastMove = 'x';
}

void onLeftDragEnd(DragEndDetails d) {
  xMovement += 1;
}
Inside the handlers, only the down presses set the lastMove variable's value. But all of them modifies the value of the xMovement and yMovement variables depending on which axis the button is associated with.
Inside the update function, let's add the code that will make the tank move based on the status of the three variables.
// make tank move
if (lastMove == 'x') {
  if (xMovement < 0) {
    tank.direction = Direction.left;
    tank.position = tank.position.translate(-100 * t, 0);
  }
  if (xMovement > 0) {
    tank.direction = Direction.right;
    tank.position = tank.position.translate(100 * t, 0);
  }
}
if (lastMove == 'y') {
  if (yMovement < 0) {
    tank.direction = Direction.up;
    tank.position = tank.position.translate(0, -100 * t);
  }
  if (yMovement > 0) {
    tank.direction = Direction.down;
    tank.position = tank.position.translate(0, 100 * t);
  }
}
We first check if the last pressed button is x-axis based (either left or right and the variable lastMove has a value of 'x'). Then we check if the value of xMovement is less than zero; meaning only the left button is pressed down. If so we set the tank's direction property to Direction.left and move the tank by translating the position negative 100 * t units to the left.
If the xMovement has a value greater than zero instead (only the right button is pressed down), we set the direction to Direction.right and translate the position 100 * t units to the right. Again, it's the same with up and down but y- things are involved instead of x-.
Make the tank go boom boom boom!
To link the fire button and make the tank shoot bullets out of the barrel, just call the shoot function from the handler like so:
void onFireTap() {
  shoot();
}
That's all there is to it actually.
All that's left now is to remove the code that shoots out a bullet on game start. In the resize method, remove the call to shoot from this block.
if (bullets == null) {
  bullets = List();
  shoot();
}
Done! Now we have a "fully functional" game with an on-screen gamepad controller. Depends on how you define "functional". Test the game out on a real device or on an emulator in computer with a touch-screen monitor to check out multi-touch support.
Conclusion
I hope you find this tutorial helpful. Remember that you don't have to code the way exactly like I do or use the same exact layout I did. But feel free to do so if you want to. Have fun making games!
If you have any questions, contact me with an email, drop a comment below, or join my Discord server.