On-screen joystick/joypad game controller with Flame
Recently, I’ve posted a tutorial on how to make an on-screen gamepad controller. While it would be helpful, most modern consoles with controllers now support joystick as the main directional controls (or at least have a joystick beside the conventional arrows). This time we’ll be building an on-screen joystick controller for mobile games using Flame and Flutter.
If you’re interested in the more basic and four-directional control tutorial, you can find it here.
We’ll put it on top of a game similar to Lame Tank (what we had under the gamepad controller tutorial). We’ll call the new game:
Wait for it… Lame Tank 360!
Because this time we’ll support the full 360° of rotation. And we’ll separate the turret rotation from the body. So we’ll have to build two joysticks.
Also, from this point forward, let’s call them “joypads” since we won’t really be building sticks. We’ll mimic how the joystick behaves onto a pad on a touch screen.
Lastly, we’ll be building the game joypad controllers first before the game. Unlike in the gamepad controller tutorial where we built the game first before the controllers.
I won’t be explaining the concepts that much here especially ones that are covered in the gamepad controller tutorial. If you want to learn the basics, I recommend myFlame and Flutter game development tutorial for beginners.
Setting up an app
Let’s start with the usual, assuming you have Flutter set up and good to go. In your terminal, type the Flutter create command:
$ flutter create lame_tank_360
Bash
Like most (if not all) tutorials I write, it’s your choice to completely follow along using the same name (Lame Tank 360) or choose your own. Just look out for the parts of the code where you need to replace what’s in this tutorial with your preferred name.
Game settings
The game can now be ran but you’ll only see the default Flutter application. To change this, we will need to open the project/folder into your favorite IDE or text editor. Then look for and edit the file ./lib/main.dart and clean it up.
Delete everything in the file and write in this block of code instead.
import 'package:flutter/material.dart';
import 'package:flutter/services.dart';

Future main() async {
  // set preferred orientations (landscape only)
  await SystemChrome.setPreferredOrientations([
    DeviceOrientation.landscapeLeft,
    DeviceOrientation.landscapeRight,
  ]);

  // disable all UI overlays (show fullscreen)
  await SystemChrome.setEnabledSystemUIOverlays([]);
}
Everything else was deleted, the services library was imported, main was converted to an async function, app is locked in either left or right landscape orientation, and lastly, all UI overlays are hidden so the app is full screen.
Speaking of cleaning up, you might want to delete the ./test directory along with all its contents to avoid error messages later. We won’t be using test-driven-development for this tutorial so it should be fine.
Stack and layout
Let’s prepare the containing widget tree for our game. The widget tree will basically be a Stack widget and its children are the layers of the game.
The layers will be:
- The game itself – where the field of grass, the tank, and bullets will be drawn.
- The UI layer – where the joypad and buttons will be drawn.
The game layer will be under the UI layer of course.
To do this, add the following block of code just below the code that sets the app to full screen.
// start app
runApp(
  Directionality(
    textDirection: TextDirection.ltr,
    child: Stack(
      children: [
        // placeholder for game
        Container(
          color: Color(0xff27ae60),
        ),

        // joypad overlay
        Container(),
      ],
    ),
  ),
);
Just a quick recap, Directionality is required for some widgets like Stack that’s why we had to define it in there with an LTR (left to right) direction. Stack‘s children are rendered on the same order as they are defined in the list so the game will render first then the joypad overlay, making it render above/on top of the game.
Creating the joypad widget
A quick heads up, as I’ve mentioned at the start of this article, I won’t be explaining the most basic stuff in as much detail as possible. Similarly, to keep the focus on the topic (creating a joypad for a game), I won’t be diving too much into the creation of widgets which is what we’ll do in this section but is actually out of scope for this tutorial.
Since we will be using two joypads, one for the body of the tank and one for the turret, we’ll create a Widget that we can reuse. Widgets are mostly just collections of other widgets but sometimes it has a custom painter that does the actual rendering of the widget.
Create a new widget class
This is the code for the Joypad widget class. Usually, I would discourage just blindly copying and pasting code you find on the internet. It is best to read understand and write the code manually onto your project, preferably with modifications whenever they make sense.
But…
Since the topic of Flutter Widgets is a large one on its own, just copy and paste this class file into ./lib/widgets/joypad.dart for now.
I’ll try to break it down and explain a bit after the code.
import 'dart:math';
import 'package:flutter/material.dart';

class Joypad extends StatefulWidget {
  final void Function(Offset) onChange;

  const Joypad({
    Key key,
    @required this.onChange,
  }) : super(key: key);

  JoypadState createState() => JoypadState();
}

class JoypadState extends State {
  Offset delta = Offset.zero;

  void updateDelta(Offset newDelta) {
    widget.onChange(newDelta);
    setState(() {
      delta = newDelta;
    });
  }

  void calculateDelta(Offset offset) {
    Offset newDelta = offset - Offset(60, 60);
    updateDelta(
      Offset.fromDirection(
        newDelta.direction,
        min(30, newDelta.distance),
      ),
    );
  }

  Widget build(BuildContext context) {
    return SizedBox(
      height: 120,
      width: 120,
      child: Container(
        decoration: BoxDecoration(
          borderRadius: BorderRadius.circular(60),
        ),
        child: GestureDetector(
          child: Container(
            decoration: BoxDecoration(
              color: Color(0x88ffffff),
              borderRadius: BorderRadius.circular(60),
            ),
            child: Center(
              child: Transform.translate(
                offset: delta,
                child: SizedBox(
                  height: 60,
                  width: 60,
                  child: Container(
                    decoration: BoxDecoration(
                      color: Color(0xccffffff),
                      borderRadius: BorderRadius.circular(30),
                    ),
                  ),
                ),
              ),
            ),
          ),
          onPanDown: onDragDown,
          onPanUpdate: onDragUpdate,
          onPanEnd: onDragEnd,
        ),
      ),
    );
  }

  void onDragDown(DragDownDetails d) {
    calculateDelta(d.localPosition);
  }

  void onDragUpdate(DragUpdateDetails d) {
    calculateDelta(d.localPosition);
  }

  void onDragEnd(DragEndDetails d) {
    updateDelta(Offset.zero);
  }
}
That’s a large chunk of code to break down so let’s do this in bullet list format:
- There are two types of Flutter widgets,
StatelessWidgets andStatefulWidgets. Stateless widgets are widgets that are simple and do not manage dynamic data. They usually do not change during their lifetime. Stateful widgets, on the other hand, could be dynamic and have their appearance, position, and other properties depend on data that could change. - We are using
StatefulWidgetfor the joypad. - Stateful widgets are composed of a Widget and a State. Why this is so is yet another topic which is already answered here.
- On creation, we require a function as a parameter to
onChange. The function passed must accept anOffsetitself so it is aware of the current delta for the widget. - The
buildmethod contains the full layout of the joypad itself. - Inside the
buildmethod, there’s aGestureDetectorthat listens to three events (drag down, drag update, drag end). - On drag down (the moment a player touches the joypad) and on drag update (every time the touched finger moves) the delta is recalculated in
calculateDelta. The calculated delta is then passed toupdateDelta - On drag end (the moment the dragging finger is lifted), a zero
Offsetis passed toupdateDelta. - Inside
updateDelta, the function insideonChangeis called passing the new (updated) delta into it. Then the function callssetStatewhich triggers Flutter to call thebuildmethod again for this widget, effectively updating the joypad’s appearance.
If you need to discuss this widget, the calculations, and possible customizations, just join my discord server and mention me.
Add joypads to the game
Now that we have a joypad widget, let’s build the UI layer for our game.
The goal is to have something that looks like this:
Let’s go back to ./lib/main.dart. The first step is to import the Joypad widget class file like so:
import 'package:lame_tank_360/widgets/joypad.dart';
Then look for the UI layer (it should look like this):
// joypad overlay
Container(),
And replace it with the following block:
// joypad overlay
Column(
  children: [
    Spacer(),
    Row(
      children: [
        SizedBox(width: 48),
        Joypad(
          onChange: (Offset delta) => print(delta),
        ),
        Spacer(),
        Joypad(
          onChange: (Offset delta) => print(delta),
        ),
        SizedBox(width: 48),
      ],
    ),
    SizedBox(height: 24),
  ],
),
By now you should be familiar with Column and Row widgets. If not, you should check them out on Flutter’s Layouts documentation or the game controller tutorial.
For now, we’re just printing the value in delta every time it is changed inside the joypad. We’ll link this to the game later.
360° (not-so-lame) tank
Time to convert this app into a game! We’ll use the most awesome Flame game-engine as usual.
Setup Flame game
Flame is available in a pub package and can be added into a project by adding the following line into ./pubspec.yaml under the dependencies: section.
flame: ^0.16.0
Mind the spacing (two spaces before flame) and make sure to put it in the right place (below dependencies).
Run the following command in the terminal (making sure you’re in this project’s root directory):
$ flutter pub get
Bash
In Visual Studio Code, this command is automatically run every time you change (and save those changes) ./pubspec.yaml. But just run it anyway to be safe.
Next, we’ll create the game class which contains the game loop. Create a file in ./lib/lame-tank-360.dart and write the following block of code.
import 'dart:ui';
import 'package:flame/game.dart';

class LameTank360 extends Game {
  Size screenSize;

  @override
  void render(Canvas c) {}

  @override
  void update(double t) {}

  @override
  void resize(Size size) {}
}
It’s just a simple game class file that extends Flame’s Game class. Flame provides all the base code for running a game in Flutter so we don’t have to.
What we have to do though is to extend that game class by filling up those functions (resize, update, and render) with our game’s code. Let’s start with resize.
@override
void resize(Size size) {
  screenSize = size;
}
This could have been easily added in the game class file starter code but I want to explain why this is needed. Some (if not most) phones nowadays support dynamic resolutions. Users can change (lower) the resolution to conserve battery or change it to a higher setting for a higher definition which is useful when watching videos or playing games for example.
So it is possible that the resolution changes while a player is in the middle of a game.
Since Flutter uses logical pixels the app’s resolution would change in this instance. Logical pixels are calculated by Flutter so that 200 logical pixels would always be (more or less) the same size in all devices regardless of physical dimensions and resolutions.
The resize function could also be fired up when flipping the phone sideways and your game allows both portrait and landscape (in Lame Tank 360’s case, it doesn’t).
Before moving on and actually rendering stuff on the game’s canvas, let’s make sure that update and render will only run if the game already received a size from Flutter at least once.
Put the following block of code inside both **update** and **render** functions:
if (screenSize == null) {
  return; // just end execution if there's no screenSize
}
After that change, the game class file should now look like this:
import 'dart:ui';
import 'package:flame/game.dart';

class LameTank360 extends Game {
  Size screenSize;

  @override
  void render(Canvas c) {
    if (screenSize == null) {
      return; // just end execution if there's no screenSize
    }
  }

  @override
  void update(double t) {
    if (screenSize == null) {
      return; // just end execution if there's no screenSize
    }
  }

  @override
  void resize(Size size) {
    screenSize = size;
  }
}
Add the game class to the Flutter widget tree
Let’s make sure that Flutter includes our game class when rendering the app by creating an instance and including it in the widget tree.
Open up ./lib/main.dart and import the game class file:
import 'package:lame_tank_360/lame-tank-360.dart';
Next is to create an instance of the game class. This should be placed just above the runApp call.
// initialize a game first
final LameTank360 game = LameTank360();
Finally the next step is to include the game‘s .widget property in the widget tree. We can do that by replacing the following block:
// placeholder for game
Container(
  color: Color(0xff27ae60),
),
With the following:
// placeholder for game
game.widget,
Now we’re ready to continue with the development of the game class.
Field of grass
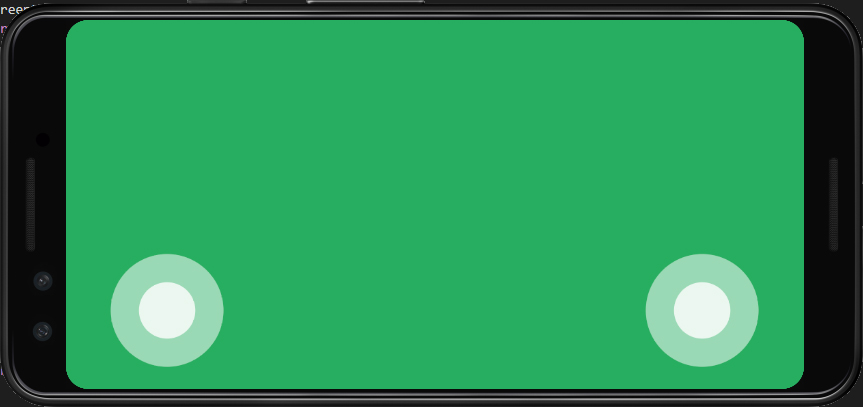
If you run the game right now, you would probably see something like this:
The game is blank so it just renders black. Let’s fix that by adding a “field of grass”. We’ll do this by drawing a green rectangle as big as the screen.
Go back to ./lib/lame-tank-360.dart and inside the render function and after the check if screenSize is null, put the following block of code.
// draw a grass field
c.drawRect(
  Rect.fromLTWH(
    0,
    0,
    screenSize.width,
    screenSize.height,
  ),
  Paint()..color = Color(0xff27ae60),
);
That should draw a color green (#27ae60) Rectangle that starts from the upper-left (0, 0) corner of the screen and is as wide and as tall as the screen itself.
Run the game now and you should see that we got back our green field of grass:
Tank
Let’s proceed to draw the tank. But just like the gamepad controller tutorial, we’ll separate it to its own class.
Create a new file in ./lib/components/tank.dart and write the following code:
import 'dart:ui';
import 'package:lame_tank_360/lame-tank-360.dart';

class Tank {
  final LameTank360 game;
  Offset position = Offset.zero;
  double bodyAngle = 0;
  double turretAngle = 0;

  Tank(this.game, {this.position});

  void render(Canvas c) {}

  void update(double t) {}
}
It’s just a basic game component class that has empty methods which we will fill up shortly. The position variable will be the center of both the body and the turret. The bodyAngle and turretAngle variables will be the current direction of the body and the turret, respectively.
Next, let’s paint the tank. Inside the render function, put the following code.
// prepare some paint objects
Paint lightPaint = Paint()..color = Color(0xffdddddd);
Paint darkPaint = Paint()..color = Color(0xff777777);

// set the canvas origin onto the tank position
c.save();
c.translate(position.dx, position.dy);

// draw tank body
c.drawRect(
  Rect.fromLTWH(-20, -15, 40, 30),
  lightPaint,
);

// draw wheels
c.drawRect(
  Rect.fromLTWH(-24, -23, 48, 8),
  darkPaint,
);
c.drawRect(
  Rect.fromLTWH(-24, 15, 48, 8),
  darkPaint,
);

// draw turret
c.drawRect(
  Rect.fromLTWH(-10, -12, 25, 24),
  darkPaint,
);
c.drawRect(
  Rect.fromLTWH(0, -3, 36, 6),
  darkPaint,
);
c.drawRect(
  Rect.fromLTWH(36, -5, 6, 10),
  darkPaint,
);

c.restore();
This is almost a direct copy of the tank rendering from the gamepad controller tutorial except for one difference. The numbers are switched around so that the tank is initially facing to the right (instead of up). This is because Dart’s ui library (like most angle calculations) has angles with zero pointing to the right.
Finally, create an instance of the tank and add it to the game class. Let’s go back to ./lib/lame-tank-360.dart. Import the tank component class file like so:
import 'package:lame_tank_360/components/tank.dart';
And add a variable that will hold the tank instance.
Tank tank;
Then initialize an instance in the resize function if it hasn’t been initialized yet.
if (tank == null) {
  tank = Tank(
    this,
    position: Offset(
      screenSize.width / 2,
      screenSize.height / 2,
    ),
  );
}
The check if tank is null makes sure that this block of code only happens once. A new instance of the Tank class is created and assigned to the tank variable. If the phone’s (or app’s) resolution changes again, the resize function is called again but no new tank will be created since the check will return false bypassing this whole block.
Lastly, make sure that the tank is rendered by calling the tank’s render function from within the game class’ own render function.
// draw the tank
tank.render(c);
Rendering happens in the order that you write them. So make sure to add the line above (tank.render(c);) below the render call for the field of grass. Otherwise, the tank will be drawn first and the field of grass next in front of it, making the tank invisible.
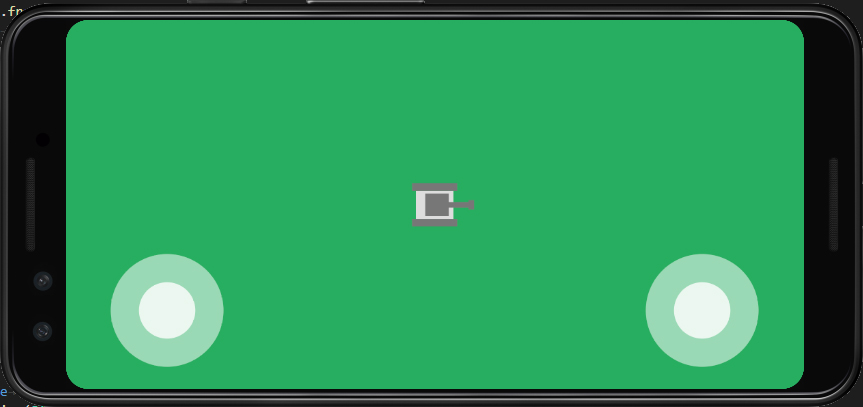
After that, you should see the following when you test run the game.
Attaching body rotation
Now on to the fun part, let’s attach the left joypad to the tank. Or rather let’s make the tank react to the left joypad. Open up ./lib/components/tank.dart.
We’re going to need access to the pi constant and some math operations so let’s import the math library.
import 'dart:math';
Then, just before we draw the tank, we need to transform canvas by rotating it based on the supposed angle of the body. This can be done with the following code.
// rotate the whole tank
c.rotate(bodyAngle);
Remember to rotate the canvas just before the body is rendered.
Instead of just altering the bodyAngle according to the angle of the joypad instantly, we’ll make it so that the tank turns towards the angle of the joypad at a fixed rate.
To do this, we need a variable that will store a target angle and the tank body will try and turn towards that target angle.
Let’s name this variable targetBodyAngle and declare it put the following line of code along with the other instance variables.
double targetBodyAngle;
Remember that the initial value for unassigned variables is null.
Next, we’ll write the code that will make the body angle turn towards the target body angle. Update the update function so that it looks like this.
void update(double t) {
  final double rotationRate = pi * t;

  if (targetBodyAngle != null) {
    if (bodyAngle < targetBodyAngle) {
      if ((targetBodyAngle - bodyAngle).abs() > pi) {
        bodyAngle = bodyAngle - rotationRate;
        if (bodyAngle < -pi) {
          bodyAngle += pi * 2;
        }
      } else {
        bodyAngle = bodyAngle + rotationRate;
        if (bodyAngle > targetBodyAngle) {
          bodyAngle = targetBodyAngle;
        }
      }
    }
    if (bodyAngle > targetBodyAngle) {
      if ((targetBodyAngle - bodyAngle).abs() > pi) {
        bodyAngle = bodyAngle + rotationRate;
        if (bodyAngle > pi) {
          bodyAngle -= pi * 2;
        }
      } else {
        bodyAngle = bodyAngle - rotationRate;
        if (bodyAngle < targetBodyAngle) {
          bodyAngle = targetBodyAngle;
        }
      }
    }
  }
}
Okay, this is a lot to breakdown. First, we declare a rotationRate constant with a value of pi multiplied by the current time delta (t) for this run. Then we either subtract or add a the rotationRate value depending on what's the relation between the current bodyAngle and targetBodyAngle.
I can't possibly imagine describing the code above without the explanation being shorter than a post of its own. So for now, just copy the code and I'll just follow up a new post explaining this.
Moving on to ./lib/lame-tank-360.dart, inside the update function, make sure that the tank's update function is called. Just add the following line after the check if screenSize is not null.
tank.update(t);
Create a new function that will serve as the handler for joypad value changes.
void onLeftJoypadChange(Offset offset) {
  if (offset == Offset.zero) {
    tank.targetBodyAngle = null;
  } else {
    tank.targetBodyAngle = offset.direction;
  }
}
Finally, in ./lib/main.dart let's change the handler for the left joypad from:
Joypad(
  onChange: (Offset delta) => print(delta),
),
To:
Joypad(
  onChange: game.onLeftJoypadChange,
),
This makes it so that every time the onChange event fires on the joypad, the onLeftJoypadChange handler is also called and the joypad Offset is passed to it.
Separate turret rotation
Next up is the right joypad. We need to attach its changes to the turret and make it rotate separately from the tank's body.
Back into the ./lib/components/tank.dart, we'll need a target turret angle that the turret will want to chase too. So let's add that instance variable first.
double targetTurretAngle;
Next, let's edit the update function and calculate the turret angle based on the target angle, all the while considering the body angle. Write the following code after the body angle calculation.
if (targetTurretAngle != null) {
  double localTargetTurretAngle = targetTurretAngle - bodyAngle;
  if (turretAngle < localTargetTurretAngle) {
    if ((localTargetTurretAngle - turretAngle).abs() > pi) {
      turretAngle = turretAngle - rotationRate;
      if (turretAngle < -pi) {
        turretAngle += pi * 2;
      }
    } else {
      turretAngle = turretAngle + rotationRate;
      if (turretAngle > localTargetTurretAngle) {
        turretAngle = localTargetTurretAngle;
      }
    }
  }
  if (turretAngle > localTargetTurretAngle) {
    if ((localTargetTurretAngle - turretAngle).abs() > pi) {
      turretAngle = turretAngle + rotationRate;
      if (turretAngle > pi) {
        turretAngle -= pi * 2;
      }
    } else {
      turretAngle = turretAngle - rotationRate;
      if (turretAngle < localTargetTurretAngle) {
        turretAngle = localTargetTurretAngle;
      }
    }
  }
}
Again, this is a lot to unpack. It's almost exactly like the body angle calculation section but it considers the body angle by subtracting it first from the target angle. The difference becomes the local target angle for the turret and that's the turret angle that the turret will be chasing. During rendering, those two rotations would eventually be added, giving the turret its proper angle.
Then, let's make sure that when rendering the turret, it's rotated to its proper angle. Add the following to the render function after drawing the tank's "wheels".
// rotate the turret
c.rotate(turretAngle);
This rotation is applied on top of the body rotation. So it's an addition of rotations.
After that, we need to jump to the game class file (./lib/lame-tank-360.dart) and add this handler function for the right-hand side joypad.
void onRightJoypadChange(Offset offset) {
  if (offset == Offset.zero) {
    tank.targetTurretAngle = null;
  } else {
    tank.targetTurretAngle = offset.direction;
  }
}
And finally, replace the value for the onChange property of the right-hand side joypad in ./lib/main.dart. Just change this:
Joypad(
  onChange: game.onRightJoypadChange,
),
To this:
Joypad(
  onChange: game.onRightJoypadChange,
),
That should take care of all the joypad and rotation code we need for the tank. But there's still one more thing missing.
We don't want the tank to just turn. We want it to move.
Going back to ./lib/components/tank.dart, add the following code in the update function before the body angle is calculated but inside the check if targetBodyAngle is not null.
if (bodyAngle == targetBodyAngle) {
  position = position + Offset.fromDirection(bodyAngle, 100 * t);
} else {
  position = position + Offset.fromDirection(bodyAngle, 50 * t);
}
The tank should move slower (50 logical pixels) when it's turning and should move at the normal speed (100 logical pixels) when it's moving in a straight line. That's what the if check is for.
We are now done with the joypads and their connection to the tank!
A little coding challenge if you're up to it: instead of having constant movement speeds, try adding acceleration to it. Start from zero and slowly increment the movement speed until it reaches its max speed.
A second coding challenge: If you did the acceleration, why not add deceleration while you're at it.
Buttons and bullets
What's a tank that can't shoot? Let's make this tank shoot out projectiles from its barrel.
We will be adding two buttons, one on each side just above both joypads. This is done so the player can shoot using either thumb.
The button widget
Since we will be using two buttons but both look and function the same, we will avoid repeating code by creating a separate widget for the button. This will allow us to reuse the button as many times in the app as we like.
Create a file in ./lib/widgets/button.dart and paste the following widget class.
import 'package:flutter/material.dart';

class Button extends StatelessWidget {
  final void Function() onTap;

  const Button({
    Key key,
    @required this.onTap,
  }) : super(key: key);

  @override
  Widget build(BuildContext context) {
    return SizedBox(
      height: 64,
      width: 64,
      child: Container(
        decoration: BoxDecoration(
          borderRadius: BorderRadius.circular(32),
        ),
        child: GestureDetector(
          child: Container(
            decoration: BoxDecoration(
              color: Color(0x88ffffff),
              borderRadius: BorderRadius.circular(32),
            ),
          ),
          onTap: onTap,
        ),
      ),
    );
  }
}
It's just a round and white semi-transparent Container inside a GestureDetector, shaped round (limited) by another round Container. On its constructor, the onTap property is required as a parameter and expects a function. This function is called by the GestureDetector when it is tapped.
Add buttons to the UI layer
Then we jump to ./lib/lame-tank-360.dart to create the handler when tapping the buttons. Just create another function like so (empty for now but we'll fill it up later):
void onButtonTap() {}
Lastly, we need to add these buttons to our layout by opening ./lib/main.dart and adding the following blocks of code in the joypad overlay section. Put them as children of the overlay Column and just above the Row that contains the Joypads.
Row(
  children: [
    SizedBox(width: 48),
    Button(
      onTap: game.onButtonTap,
    ),
    Spacer(),
    Button(
      onTap: game.onButtonTap,
    ),
    SizedBox(width: 48),
  ],
),
This is like the Joypad row with SizedBox as spacers on the left and right edges and a Spacer widget that will take up all available space in between.
SizedBox(height: 20),
This widget just adds space between the two rows (buttons row and joypads row).
The whole joypad overlay section should now look like this:
// joypad overlay
Column(
  children: [
    Spacer(),
    Row(
      children: [
        SizedBox(width: 48),
        Button(
          onTap: game.onButtonTap,
        ),
        Spacer(),
        Button(
          onTap: game.onButtonTap,
        ),
        SizedBox(width: 48),
      ],
    ),
    SizedBox(height: 20),
    Row(
      children: [
        SizedBox(width: 48),
        Joypad(
          onChange: game.onLeftJoypadChange,
        ),
        Spacer(),
        Joypad(
          onChange: game.onRightJoypadChange,
        ),
        SizedBox(width: 48),
      ],
    ),
    SizedBox(height: 24),
  ],
),
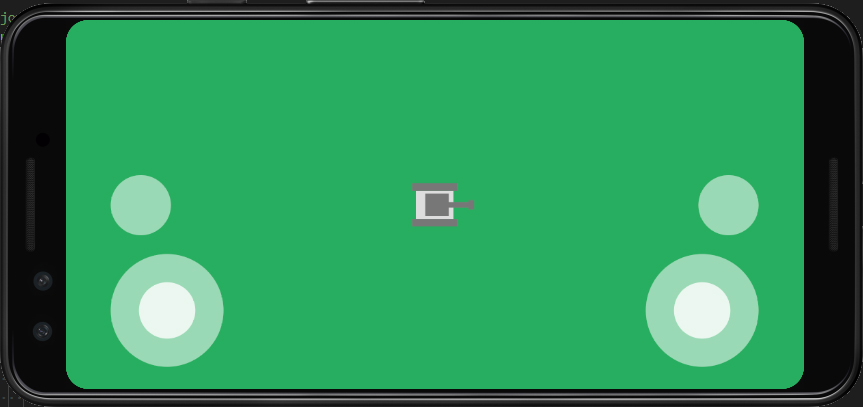
After that change, if you test run the game right now, you should see something like this:
Bullet component
We're going to recreate the bullet component we had with the gamepad tutorial. Start off by creating a class file in ./lib/components/bullet.dart. Then write in the following code.
import 'dart:ui';
import 'package:lame_tank_360/lame-tank-360.dart';

class Bullet {
  final LameTank360 game;
  final double speed = 300;
  Offset position;
  double angle = 0;
  bool isOffscreen = false;

  Bullet(this.game, {this.position, this.angle});

  void render(Canvas c) {
  }

  void update(double t) {
  }
}
Here we have yet another simple component class. The speed variable is final making it a constant and will be used to move the bullet. We also keep track of the position and angle of the bullet (both of which should be supplied on creation).
Continuing with class, let's write what should be in the render function.
void render(Canvas c) {
  c.save();
  c.translate(position.dx, position.dy);

  // rotate the canvas
  c.rotate(angle);

  c.drawRect(
    Rect.fromLTWH(-10, -3, 16, 6),
    Paint()..color = Color(0xffff0000),
  );

  c.restore();
}
The canvas is first rotated with the bullet's current angle before drawing a red rectangle.
Then in the update method, put the following code.
void update(double t) {
  if (isOffscreen) {
    return;
  }

  position = position + Offset.fromDirection(angle, speed * t);
  if (position.dx < -50) {
    isOffscreen = true;
  }
  if (position.dx > game.screenSize.width + 50) {
    isOffscreen = true;
  }
  if (position.dy < -50) {
    isOffscreen = true;
  }
  if (position.dy > game.screenSize.height + 50) {
    isOffscreen = true;
  }
}
We update the position of the bullet by adding an Offset that is created from the angle given a magnitude using the speed constant multiplied by the time delta (t) to make sure it moves at a constant rate no matter what the FPS is. Then we check if the bullet went over 50 pixels from the four edges of the screen. If so, mark it as off-screen.
Finally, the bullet component should look like this.
import 'dart:ui';
import 'package:lame_tank_360/lame-tank-360.dart';

class Bullet {
  final LameTank360 game;
  final double speed = 300;
  Offset position;
  double angle = 0;
  bool isOffscreen = false;

  Bullet(this.game, {this.position, this.angle});

  void render(Canvas c) {
    c.save();
    c.translate(position.dx, position.dy);

    // rotate the canvas
    c.rotate(angle);

    c.drawRect(
      Rect.fromLTWH(-10, -3, 16, 6),
      Paint()..color = Color(0xffff0000),
    );

    c.restore();
  }

  void update(double t) {
    if (isOffscreen) {
      return;
    }

    position = position + Offset.fromDirection(angle, speed * t);
    if (position.dx < -50) {
      isOffscreen = true;
    }
    if (position.dx > game.screenSize.width + 50) {
      isOffscreen = true;
    }
    if (position.dy < -50) {
      isOffscreen = true;
    }
    if (position.dy > game.screenSize.height + 50) {
      isOffscreen = true;
    }
  }
}
Shooting
The buttons are already connected to the game's onTapHandler so we can just write the code that will add the bullets.
But first, we need two helper functions in the tank class to get the position and direction of the bullet that will come out of the tank's turret.
Open up ./lib/components/tank.dart, and add the following functions.
Offset getBulletOffset() {
  return position +
      Offset.fromDirection(
        getBulletAngle(),
        36,
      );
}

double getBulletAngle() {
  double bulletAngle = bodyAngle + turretAngle;
  while (bulletAngle > pi) {
    bulletAngle -= pi * 2;
  }
  while (bulletAngle < -pi) {
    bulletAngle += pi * 2;
  }
  return bulletAngle;
}
The getBulletOffset function returns the position of the tank plus a new Offset created from the turret's angle and length. The bullet angle is just a sum of the tank's body angle and the turret's angle. The two while loops make sure that the angle doesn't go over pi or under negative pi.
Then let's jump back to ./lib/lame-tank-360.dart.
At any given point, there could be multiple bullets flying around. To be able to store them, we'll use a List of Bullets.
So first things first, let's import the bullet class file into the file.
import 'package:lame_tank_360/components/bullet.dart';
Then add an instance variable that will hold the bullets:
List bullets;
In the resize method, let's make sure that the list is initialized. Put the following block of code just below the tank initialization.
if (bullets == null) {
  bullets = List();
}
After that, we need to make sure that bullets are updated along with the game class. Put the following in the bottom part of the update function.
// make bullets fly
bullets.forEach((Bullet b) {
  b.update(t);
});

// remove off-screen bullets
bullets.removeWhere((Bullet b) {
  return b.isOffscreen;
});
The first block cycles through all existing bullets in the list and updates them. The second block just removes the bullets that already flew out of the screen.
Let's also make sure that the bullets are drawn. So in the render function put this block:
// draw bullets
bullets.forEach((Bullet b) {
  b.render(c);
});
Now the only thing left is to create a new bullet and add it to the list every time the tap handler for the button is fired. Edit the onButtonTap handler so it looks like the following:
void onButtonTap() {
  bullets.add(
    Bullet(
      this,
      position: tank.getBulletOffset(),
      angle: tank.getBulletAngle(),
    ),
  );
}
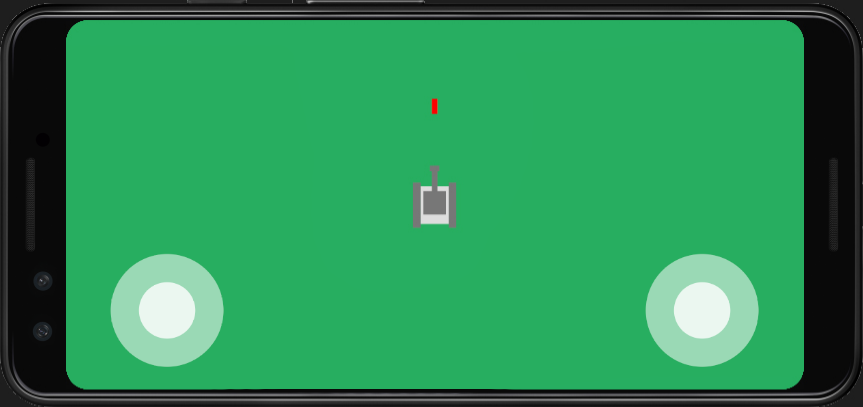
With that, run the game in its final version and here's a screenshot of what it should look like.

I'll try to post a video on my youtube channel with a demo using a real phone. Recording this with an emulator wouldn't do it justice because of the required multi-touch controls.
Conclusion
Have fun creating games with awesome joypad controls. If you need an explanation on any part of this tutorial or simply have any questions, send me an email, drop a comment below, or join my Discord server.