Views and Dialog Boxes Tutorial – Step by Step with Flame and Flutter (Part 3 of 5)
When I first started game development, I thought the hardest part was starting it. I was wrong. It’s not thinking of a gameplay logic and acquiring graphics.
It’s actually finishing the game!
And developing all the little features and details that make the game feel polished.
We’re at step Step 3 of the Flame and Flutter tutorial series and work is just about to begin.
In this part, we will be taking steps that will give our game a finished feel.
We’ll be writing the different views (or screens) for the game along with dialog boxes.
Here’s the whole series:
- Introduction to game development
- Set up a playable game
- Graphics and animation
- Views and dialog boxes (you are here)
- Scoring, storage, and sound
- Finishing up and packaging
Prerequisites
- The requirements in the previous parts.
- More graphics assets – A resource pack is provided in this tutorial but feel free to make your own. Game graphics assets can also be found on resource sites like Open Game Art.
We’ll be using the same coding conventions like the ones in the previous part.
If you haven’t read the previous parts, now would be a good time to check them out starting from the beginning.
All the code for this tutorial is available for viewing and download on this GitHub repository.
The new resource pack
We’ll be using this resource pack that contains the second set of graphics we need for our game.
Click the image above or this link to download!
Important Note: The resource pack above can be used if you’re following along with this tutorial. It is part of the Langaw project on GitHub which is licensed with a CC-BY-NC-ND license.
It means that you can share, copy, and redistribute the material in any medium or format with some restrictions.
- You must give appropriate credit, provide a link to the license, and indicate if changes were made.
- You may not use the material for commercial purposes.
- If you remix, transform, or build upon the material, you may not distribute the modified material.
- You may not apply legal terms or technological measures that legally restrict others from doing anything the license permits.
Learn more about the CC-BY-NC-ND license by clicking here.
Development – Time to code
At the end of the last part of this tutorial series, we had a game with interactivity, decent graphics, and animation.
It’s playable, but in this part, we’ll give the user more familiar gaming experience.
We’re going to add new graphics for branding, set up a welcome screen, modify the spawn logic, and finally, set up dialog boxes that will show a “how-to-play” and credits information.
Step 1. The new graphics assets
Download the resource pack for this part and put them inside the ./assets/images directory.
You can choose to make and use your own graphics or find the resources you need on resources sites like Open Game Art if you like.
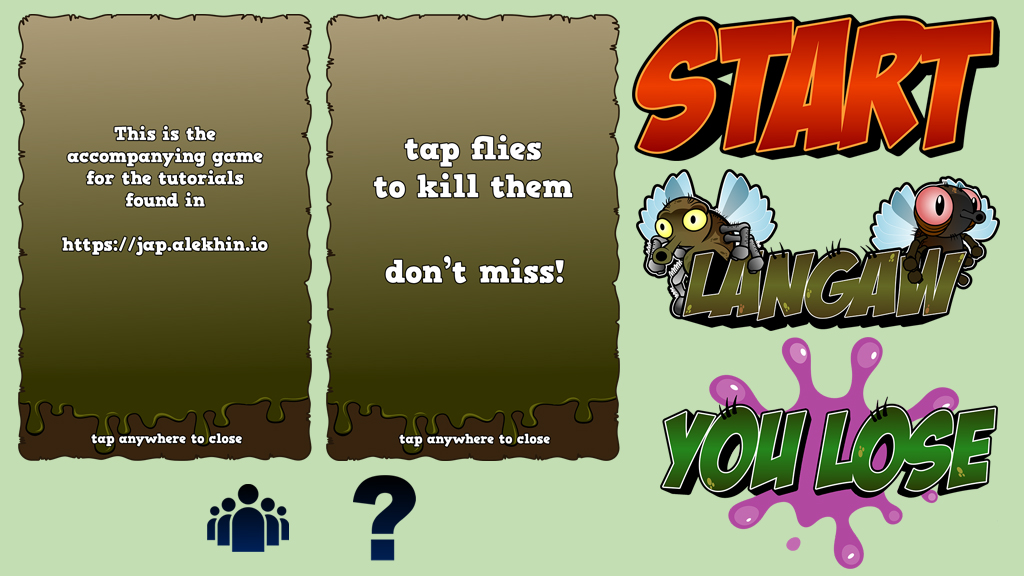
For this part we need seven images:
-
Title image for branding (preferably
7:4aspect ratio –7 by 4 tiles) -
Start button (preferably
2:1aspect ratio –6 by 3 tiles) -
“You lose” splash image (preferably
7:5aspect ratio –7 by 5 tiles) -
Credits dialog box (preferably
3:2aspect ratio –12 by 8 tiles) - Help dialog box (same size as credit dialog box)
-
Credits icon (preferably a square –
1 tile) - Help icon (same size as credit icon)
Note: Our game uses a nine-tile wide sizing with dynamic height based on the aspect ratio of the phone the player is using. Please refer to the previous parts for sizing explanation if you need more info.
The following is a list of the new files you should have in the assets directory:
./assets/images/bg/lose-splash.png
./assets/images/branding
./assets/images/branding/title.png
./assets/images/ui
./assets/images/ui/dialog-credits.png
./assets/images/ui/dialog-help.png
./assets/images/ui/icon-credits.png
./assets/images/ui/icon-help.png
./assets/images/ui/start-button.png
Add to Flutter bundle and preload
Like the graphics assets in the previous resource pack, we need to tell Flutter that we want these new files to be included when bundling the application.
To do this, we add the following lines into the assets sub-section in ./pubspec.yaml:
    - assets/images/bg/lose-splash.png
    - assets/images/branding/title.png
    - assets/images/ui/dialog-credits.png
    - assets/images/ui/dialog-help.png
    - assets/images/ui/icon-credits.png
    - assets/images/ui/icon-help.png
    - assets/images/ui/start-button.png
Note: Mind the indentation in ./pubspec.yaml. Sections and subsections are defined using indentations that are made up of two spaces.
Next, we preload these images at the start of the game along with the original graphics assets.
Open up ./lib/main.dart and add the following filenames into the list of strings passed to the call to Flame.images.loadAll:
'bg/lose-splash.png',
'branding/title.png',
'ui/dialog-credits.png',
'ui/dialog-help.png',
'ui/icon-credits.png',
'ui/icon-help.png',
'ui/start-button.png',
View the code at this step on GitHub.
Step 2. Views
A good game should have at least a welcome view and a play view. It’s also a good idea to have some sort of break after playing for a long time, winning, or losing.
But players should be able to identify what “screen” or view they’re currently looking at. This will help the player decide which actions to make. In our game’s case, if the player should be tapping the flies or should they press the Start button first.
Preparing views
Our game will have three views:
- A home view (or welcome view) that shows up when you first open the game. It shows a title in the middle of the screen. A “start” button will also be displayed near the bottom of the screen.
- The “playing” view which is the view you’d be looking at when you play the game. This view hides the title image and focuses on the flies flying around.
- And a “you lost” view that shows up when you lose the game. When a player loses, a “you lose” splash image will be shown in the middle of the screen with the start button so the player can try again.
Note: For all these views, the same background will be shown and the flies will be visible. This makes it feel like the playing view is the main view, while the home view welcomes the player into the game, and finally, the “you lost” view is the break in-between game sessions when the player loses.
The game needs to remember the current view. We could do this with integers and number the views from 0 to 2 or 1 to 3. We could also remember the views as a string.
But let me introduce you to this data type called enum. It’s short for enumerated type.
This is applicable since we will enumerate the views when checking what view we are in or telling the game to change views.
Following the one-class-per-file convention from the previous parts (even though enums aren’t really classes), let’s place our view in a new file.
Create a file and name it ./lib/view.dart and put the following block into it.
enum View {
  home,
  playing,
  lost,
}
Now we need to add an instance variable to our game that will hold the value of the current view for us.
We have to import the View enum first before we use it, so open up ./lib/langaw-game.dart and add the following line into the imports section:
import 'package:langaw/view.dart';
Then let’s add the instance variable. Let’s name it activeView and set its type to View (the one we declared earlier with an enum).
View activeView = View.home;
Now we’re ready to work on each view.
The home view
Views have been mentioned multiple times and each of their behaviors has been described above.
But what is a view?
In code, a view is just another component-like logic can have its own sub-components. It can be a virtual (by that I mean embedded into the game logic) like the “playing” view which is always visible no matter what view the player is really on.
In the home view’s case though, we’re going to use a component class when defining our view. Just like any other component, we’ll just call its instance’s render and update methods from the game loop.
Let us first create a new folder under ./lib and name it views.
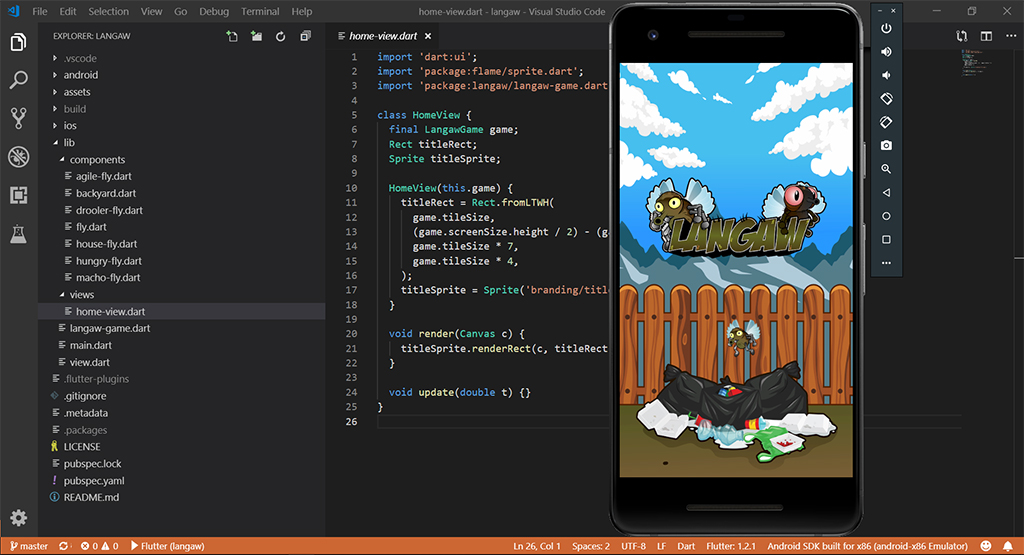
Inside this folder, let’s create a file named ./lib/views/home-view.dart and write in the following code.
import 'dart:ui';
import 'package:flame/sprite.dart';
import 'package:langaw/langaw-game.dart';

class HomeView {
  final LangawGame game;
  Rect titleRect;
  Sprite titleSprite;

  HomeView(this.game) {}

  void render(Canvas c) {}

  void update(double t) {}
}
Breakdown: If you’ve been following the tutorial series, this format should be familiar now.
First, we import the files that contain the classes and definitions we will use. Then we define a class named HomeView which has three instance variables, one of which is final and needs to be passed when creating an instance of this class.
The class has a constructor method and two other methods that will be used by the game loop called render and update.
Inside the constructor, we’ll initialize the titleRect and titleSprite variables so they’re ready to use inside the render method.
titleRect = Rect.fromLTWH(
  game.tileSize,
  (game.screenSize.height / 2) - (game.tileSize * 4),
  game.tileSize * 7,
  game.tileSize * 4,
);
titleSprite = Sprite('branding/title.png');
Breakdown: This block of code is actually just two lines. The first one assigns a value to the titleRect variable, the second assigns a value to the titleSprite variable.
The value for the titleRect variable is a definition of a Rect that is spread vertically into size lines. The four middle lines correspond to the parameters required by the factory constructor .fromLTWH.
We know beforehand that we will be displaying the title image inside a 7-by-4-tile rectangle. This is why we pass game.tileSize * 7 and game.tileSize * 4 to the last two parameters which correspond to the Width and Height of the rectangle.
For the Left parameter, we subtract the width of the title image’s rectangle (7 tiles) from the screen width (9 tiles) and we get two tiles of extra space. To center the image, we distribute these two extra tiles to each side (left and right) making the image offset by one tile. This is why we pass in game.tileSize * 1 or simply game.tileSize because that makes more sense.
The Top parameter is a little different. We don’t want the title image to be in the absolute center on the screen. Let’s have the bottom of the title image sit on the vertical center of the screen. To calculate the center, we just divide the height of the screen by two. Subtracting the height of the title image (4 tiles) from it will give us the proper offset we want to achieve the kind of centering we want.
Now that we have titleRect and titleSprite initialized, we can write the code that will render the actual image.
Inside the render method, insert the following line:
titleSprite.renderRect(c, titleRect);
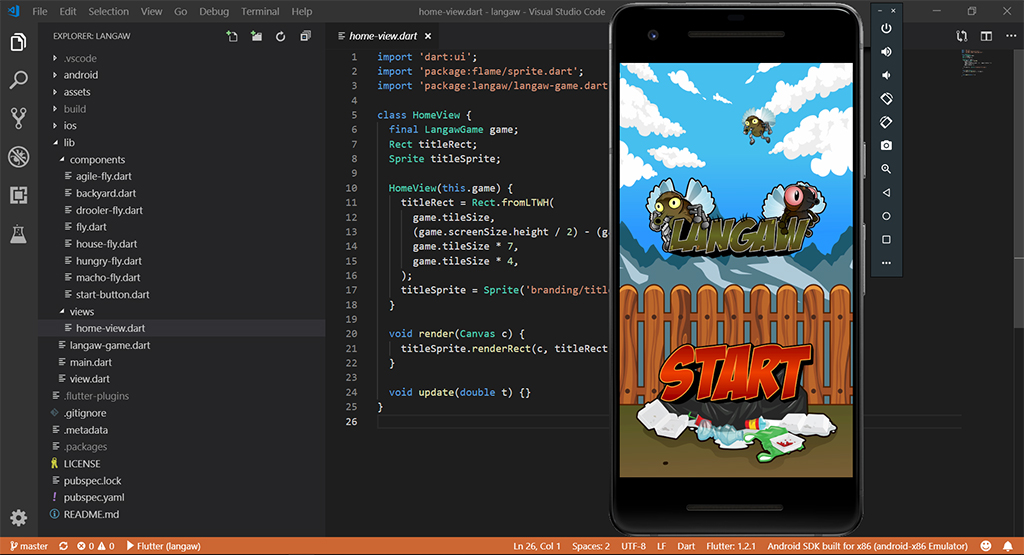
The new HomeView class file should look like this:

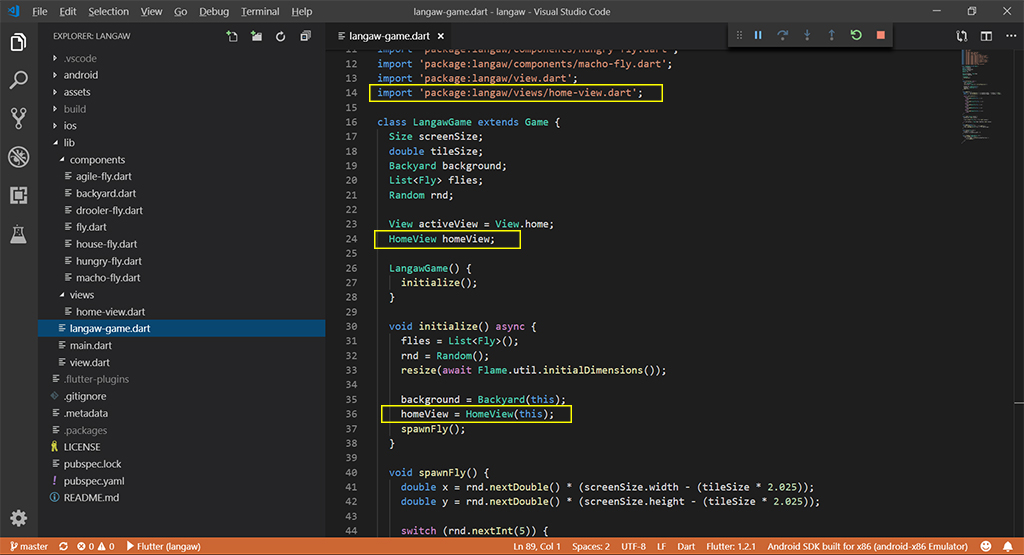
Let’s quickly jump to the game class ./lib/langaw-game.dart and import the HomeView class file in there using the following line:
import 'package:langaw/views/home-view.dart';
Then add an instance variable named homeView with its type set to HomeView:
HomeView homeView;
We need to initialize this variable after the screen size has been determined so we put the following line of code inside the initialize method anywhere after the call to resize.
homeView = HomeView(this);
The game file should now look like this:
Finally, we want whatever HomeView renders to be rendered on the screen so inside the game class’ render method, let’s call the HomeView instance render method at the end so it’s rendered last:
if (activeView == View.home) homeView.render(canvas);
Note: Rendering happens in the same order as it is written. What we want is background first, then the flies, and lastly the title. This will make sure that the title is on top of everything we have on the screen so far.
Breakdown: We check if the active view is currently the home view. If it is, we render the homeView instance. If it’s not, the render method will simply skip this line so the homeView instance (meaning the title) is not rendered.
If you run the game right now you should see something like this:
Start button component
When inside the game view, the player can still tap and drop flies. But that will have no effect on the game, like losing the game which will be developed later. In addition, no score will be added for every fly the player drops. Scoring will be discussed much later in the next part.
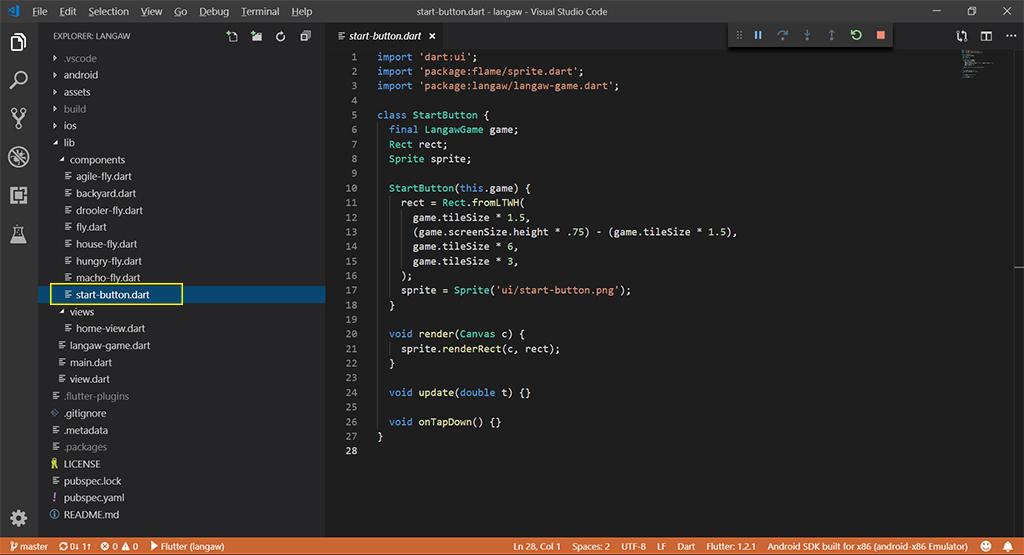
So to start a game, we must have a start button. To start, let’s create another component and call it StartButton. Create a file named ./lib/components/start-button.dart.
import 'dart:ui';
import 'package:flame/sprite.dart';
import 'package:langaw/langaw-game.dart';

class StartButton {
  final LangawGame game;
  Rect rect;
  Sprite sprite;

  StartButton(this.game) {}

  void render(Canvas c) {}

  void update(double t) {}

  void onTapDown() {}
}
Breakdown: This class definition is the same with all the other classes we have defined included the most recent one which is the HomeView. One thing to notice here is the onTapDown handler. This will contain code that will “start” the game.
Let’s go inside the constructor and initialize the rect and sprite variables:
rect = Rect.fromLTWH(
  game.tileSize * 1.5,
  (game.screenSize.height * .75) - (game.tileSize * 1.5),
  game.tileSize * 6,
  game.tileSize * 3,
);
sprite = Sprite('ui/start-button.png');
Breakdown: This is almost exactly the same as the initialization of the title image in HomeView‘s constructor.
The main difference is, aside from the size which is 6 by 3 tiles, is the Left and Top offsets.
Start button’s width is 6 tiles meaning we have three extra tiles from the screen’s nine-tile width. This gives us 1.5 tiles on each side so we feed game.tileSize * 1.5 to the Left parameter.
For the Top parameter, this calculation will put the button’s vertical center at exactly three fourths (`.75) of the screen’s height (from top to bottom). Please drop a comment if you need an explanation about this calculation.
After initializing the rect and sprite variables, we need to render the image so let’s put this line inside the render function:
sprite.renderRect(c, rect);
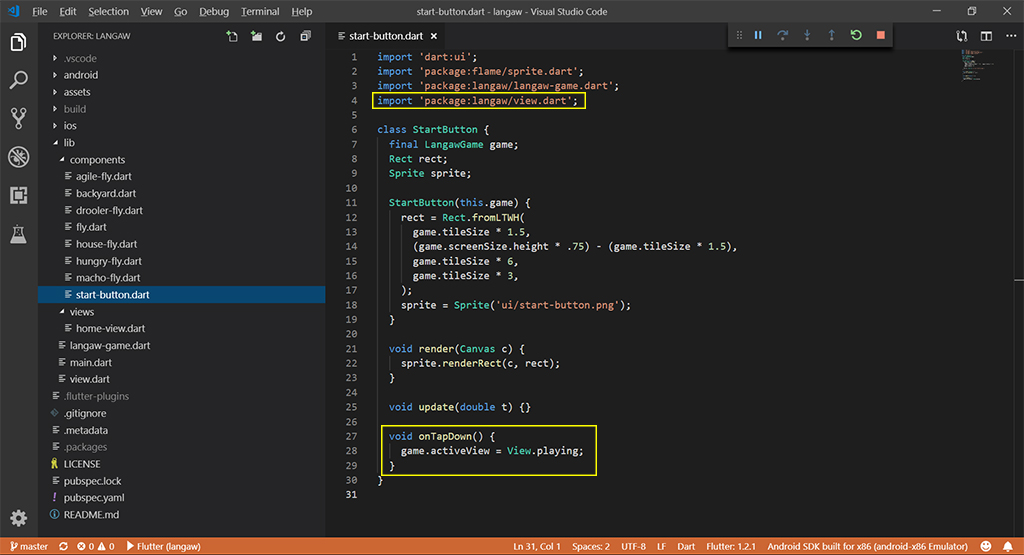
With that, ./lib/components/start-button.dart should now look like this:
We now have to add an instance of the StartButton component into our game class so open up ./lib/langaw-game.dart.
Add this in the imports section:
import 'package:langaw/components/start-button.dart';
Then add this instance variable along with the other instance variables:
StartButton startButton;
Initialize the startButton variable with a new instance of the StartButton class after the screen size is determined.
startButton = StartButton(this);
This line should to the render method:
if (activeView == View.home || activeView == View.lost) {
  startButton.render(canvas);
}
As you may have noticed, those four lines (although the last one is a block) are needed to import a class, make an instance of that class and store it in an instance variable, and finally render it.
The start button will be rendered on both the home view and “you lost” view. This is so that the player can start a game from the home view or after losing a game.
Time to test run the game! You should see the start button in the game now:
Handle start button taps
Next we need that start button to react to a tap.
But first, we need to make sure that taps don’t go through objects. For example if you tap on the startButton a fly in the same location shouldn’t receive the tap event.
In our game class’ onTapDown handler, we’ll create a variable that will remember if a tap handler has been called.
Let’s call this variable isHandled. Let’s create this at the beginning of the onTapDown handler and set the initial value to false.
bool isHandled = false;
Before checking if the tap hits a component’s rectangle, we first check if isHandled still has a value of false, only then will it call the component’s tap down handler.
if (!isHandled && startButton.rect.contains(d.globalPosition)) {
  if (activeView == View.home || activeView == View.lost) {
    startButton.onTapDown();
    isHandled = true;
  }
}
Breakdown: First, a check is done on isHandled to make sure the tap event is not handled yet. That check is coupled with a check if the click is inside the startButton‘s rect property. If the check passes those conditions, an additional check is done if the player is currently in the home view or in the “you lost” view.
Only if all those conditions are met will the game call the start button’s onTapDown handler. The variable isHandled is also flipped to true to let the next lines of code know that this tap is already handled.
Note: All those conditions can be written inside one if statement. But the if line would be so long that I would have to spread it vertically for readability (just like defining Rects). But to be honest, that just makes it look ugly and less readable. So let’s just stick with two if statements.
Another step we have to do is wrap the current fly tap handler with a check on isHandled like so:
if (!isHandled) {
  flies.forEach((Fly fly) {
    if (fly.flyRect.contains(d.globalPosition)) {
      fly.onTapDown();
      isHandled = true;
    }
  });
}
Breakdown: It’s basically the same block of code from what we have last time with two changes. The first is it’s wrapped with a check on isHandled which makes the block of code run only if the tap has not been handled yet (in this case by the start button since that’s the only handler above). The second change is flipping the isHandled variable to true if at least one of the flies is hit.
Note: When handling taps, check the the topmost object first. This is in reverse order of the rendering. The bottom-most (first to be rendered) object should be checked for a tap hit last. So we check the top-most object (last to be rendered) for the tap first.
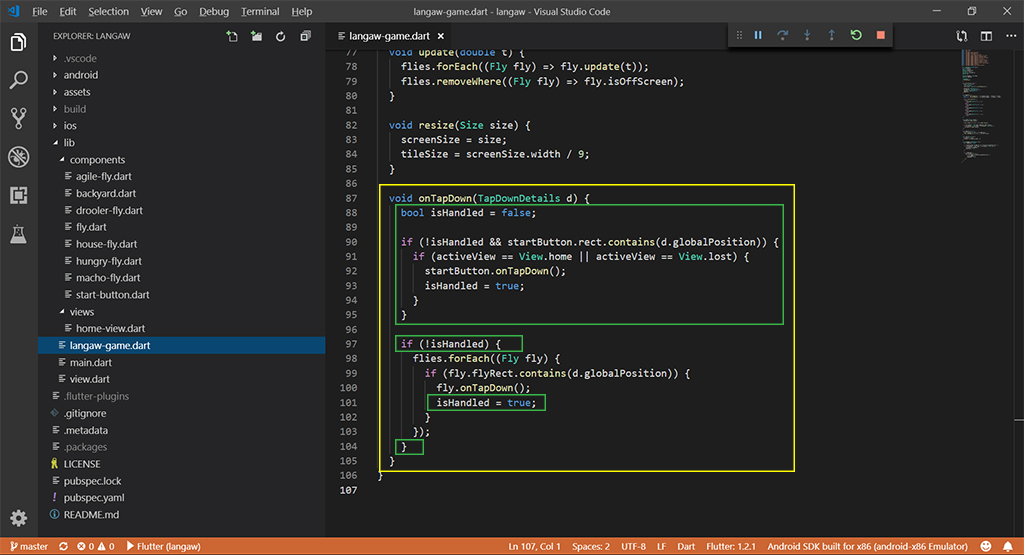
The onTapDown handler of the game class file should look like this:
Lastly, we need to go back to the start button file (./lib/components/start-button.dart) and write the code that actually handles the tap.
When the onTapHandler of the start button is called we need to set the game’s activeView to View.playing. Because of this we need to import the file where View enum is defined.
import 'package:langaw/view.dart';
Then inside the onTapHandler the following line of code will set the game’s activeView to the desired value:
game.activeView = View.playing;
The start button class file should now look like this:
Now is a good time to run the game and test the start button functionality!
Losing Condition
Before we create the “you lost” view, let us first talk about what makes a player lose the game. There are two conditions. The first one is if the player taps on the screen and misses (i.e. not hit a fly). We will focus on this condition for now. Let’s reserve the second condition for the next part where scoring is involved.
To check if a tap hits a fly or totally misses, we need to make another boolean variable that will act as a flag if a fly is hit. This variable will be defined before looping over the flies for hit testing.
Open up ./lib/langaw-game.dart and place the following variable declaration inside the onTapDown handler just before looping over the flies:
bool didHitAFly = false;
While looping over the flies put the following line inside the if block that tests if the tap hit a fly, preferably before or after setting the isHandled variable to true:
didHitAFly = true;
Then right after the forEach loop, we’ll check if we are currently in the “playing” view and if the tap did not hit a fly.
if (activeView == View.playing && !didHitAFly) {
  activeView = View.lost;
}
Breakdown: In the if statement, we check for two things. The first is if we’re in the “playing” view, because we can’t lose if we’re not playing. The other thing we check is if we did NOT hit a fly.
If those two conditions are met, we set the activeView to View.lost value which correspond to the “you lost” view.
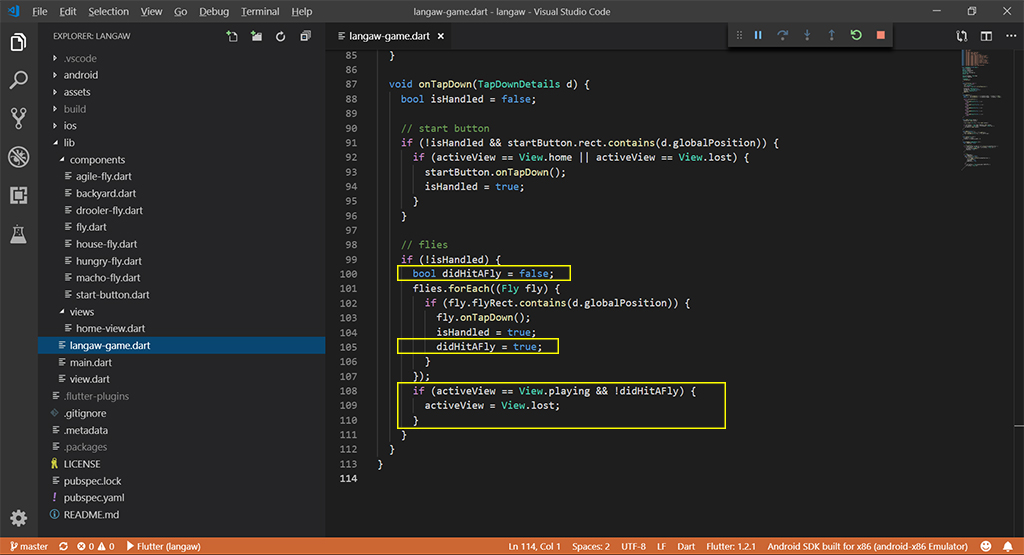
The onTapDown handler should now look like this (I added in some comments):
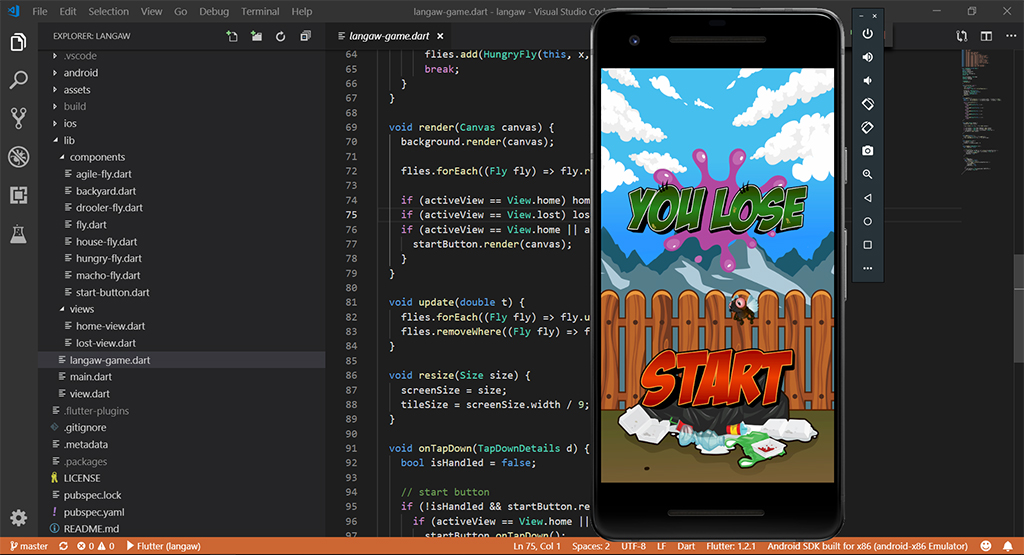
Try running the game and you’ll see that if you miss, the start button shows up. If you remember the render method, the start button only shows up if you’re on the home view or “you lost” views.
Since the title doesn’t show up, it means that we’re not in the home view, leaving only the possibility that we are in the “you lost” view confirming that our code works.
“You lost” view
The last view will almost be exactly the same as the home view. The only difference is we’ll show a different image instead of the title.
Create a new view file in ./lib/views and name it lost-view.dart:
import 'dart:ui';
import 'package:flame/sprite.dart';
import 'package:langaw/langaw-game.dart';

class LostView {
  final LangawGame game;
  Rect rect;
  Sprite sprite;

  LostView(this.game) {
    rect = Rect.fromLTWH(
      game.tileSize,
      (game.screenSize.height / 2) - (game.tileSize * 5),
      game.tileSize * 7,
      game.tileSize * 5,
    );
    sprite = Sprite('bg/lose-splash.png');
  }

  void render(Canvas c) {
    sprite.renderRect(c, rect);
  }

  void update(double t) {}
}
Breakdown: As you can see this is almost identical to the home view file. The difference is the filename of the image file being loaded by the Sprite and the height of the image which is 5 tiles.
Just like the home view, we need to go to the game class file ./lib/langaw-game.dart, make an instance of the LostView class, and render it.
Import the lost view file:
import 'package:langaw/views/lost-view.dart';
Create an instance variable:
LostView lostView;
Instantiate a LostView object and assign it to the lostView variable inside the initialize method (after the screen size is determined):
lostView = LostView(this);
Then inside the render method, render it:
if (activeView == View.lost) lostView.render(canvas);
Breakdown: Again those for lines are are standard for adding a component or view into a game class.
Note: It’s preferable to add each of those lines to their home view counterparts.
If you run the game, click the start button, and click anywhere on the screen where there’s no fly, you should see a “you lose” splash message on the screen like this:
View the code at this step on GitHub.
Step 3. Rewriting the spawn controller
Near the conclusion of the previous part, I’ve mentioned that we have a couple of bugs in our game right now. One which is how the flies are spawned and there are two sides to it.
On the technical side, when looping over a List using forEach the code should not modify the list (either add items to or remove items from it).
Our game is doing this.
As we cycle through all the flies (using forEach) during the hit test, if we hit one fly, we spawn another. Remember that as we add a fly, we are inside the forEach loop. This gives out a concurrent modification error.
Although that in itself is a serious thing, that’s not really “the bug” in our game.
It’s the logic of when to spawn flies itself.
Flies should spawn based on time not based on when the player tapped one.
The spawn controller
Let’s create a spawn controller for this. Remember that controllers as just components without a position or graphical representation.
Create a new folder in ./lib and name it controllers. Then inside this folder create a file named ./lib/controllers/spawner.dart.
import 'package:langaw/langaw-game.dart';

class FlySpawner {
  final LangawGame game;

  FlySpawner(this.game) {}

  void start() {}

  void killAll() {}

  void update(double t) {}
}
Breakdown: The component structure should be familiar by now. The only difference is we don’t have a render method as this component (which is a controller) will not have a graphical representation on the screen.
Like the other components and views, we keep a reference to the LangawGame instance inside a final variable called game and require a value to this variable as a parameter to the constructor.
First, let’s write the killAllMethod, for that we need access to the Fly class so we import it first:
import 'package:langaw/components/fly.dart';
Then inside the killAll method, add this line of code:
game.flies.forEach((Fly fly) => fly.isDead = true);
This cycles through all existing flies in the game‘s flies List (if there are any), and assigns the value true to their isDead property, effectively killing all existing flies.
Before we can start writing the code the start method we need to prepare some constants first.
Add this final instance variables to the class:
final int maxSpawnInterval = 3000;
final int minSpawnInterval = 250;
final int intervalChange = 3;
final int maxFliesOnScreen = 7;
Then just below those, let’s add these two other variables:
int currentInterval;
int nextSpawn;
I’ll be explaining the values from the constants and what these variables are for later in the breakdown. For now let’s write the body of the start method. This method will be called every time the player taps on the start button.
void start() {
  killAll();
  currentInterval = maxSpawnInterval;
  nextSpawn = DateTime.now().millisecondsSinceEpoch + currentInterval;
}
Breakdown: Let’s start with the first constant variable maxSpawnInterval. This constant is the upper limit on when to spawn flies. When the game starts, the currentInterval is set to the value of maxSpawnInterval. Which is 3000 milliseconds or three seconds.
The second constant, minSpawnInterval, is the exact opposite of this. Every time a fly is spawned the currentInterval variable is reduced but only down to this point which is 250 milliseconds. Or 1/4 of a second.
The third constant, intervalChange, is the amount that is reduced from currentInterval every time a fly is spawned. So starting from 3 seconds flies spawn faster and faster every time one is spawned until it gets down to 1/4 of a second but no less. This is the fastest and I’m imagining if a player gets this far it will be chaos even though there’s a limit to how many flies can be on the screen at any moment.
Which brings us to the last constant maxFliesOnScreen. Even if the game gets to point where it’s crazy fast in spawning flies, it will not spawn more as long as there are seven flies alive and flying around.
The variable currentInterval stores the amount of time to be added from the current time when scheduling the next spawn.
The last variable nextSpawn is the actual time that is scheduled for the next spawn. This variable holds a value that measures the time in milliseconds since the beginning of the Unix epoch (January 1, 1970, 12 midnight GMT).
In the start method, we first kill all the flies by calling the killAll() method. Then we reset the currentInterval to the maximum (maxSpawnInterval) and using this value we schedule the next spawn in the next line using DateTime.now().millisecondsSinceEpoch and the value of currentInterval added to it.
For now, we don’t really do any spawning, we’re just scheduling it.
Inside the constructor, add the following lines:
start();
game.spawnFly();
Breakdown: The first line will schedule to spawn a fly three seconds after an instance of this controller is created. The second line just spawns a fly.
This is done in this order because if we spawn a fly first, start() will call killAll() and will just kill the first fly ever spawned.
Now inside the update method, we will have the bulk of the spawning logic. Put the following block of code inside the update method.
int nowTimestamp = DateTime.now().millisecondsSinceEpoch;

int livingFlies = 0;
game.flies.forEach((Fly fly) {
  if (!fly.isDead) livingFlies += 1;
});

if (nowTimestamp >= nextSpawn && livingFlies < maxFliesOnScreen) {
  game.spawnFly();
  if (currentInterval > minSpawnInterval) {
    currentInterval -= intervalChange;
    currentInterval -= (currentInterval * .02).toInt();
  }
  nextSpawn = nowTimestamp + currentInterval;
}
Let’s break this down: The first line of code stores the current time (the number of milliseconds since the start of the Unix epoch).
The next block of code counts the number of flies that are in the list (game.flies) and are alive. The code just loops over the list and if the fly is not dead, add one to livingFlies.
We have a bigger block next, entering the if block checking if the current time has passed the nextSpawn value AND if the number of living flies is less than the maxFliesOnScreen constant.
If the conditions are met, we spawn one fly. After that, we reduce the value of currentInterval by the value in the intervalChange constant plus two percent of the value of currentInterval BUT only if the currentInterval is higher than the minimum interval (minSpawnInterval).
Finally, still inside the large block, we schedule the next spawn using the current time with the value of currentInterval added to it.
It might be redundant, but here’s the whole ./lib/controllers/spawner.dart file anyway:
import 'package:langaw/components/fly.dart';
import 'package:langaw/langaw-game.dart';

class FlySpawner {
  final LangawGame game;
  final int maxSpawnInterval = 3000;
  final int minSpawnInterval = 250;
  final int intervalChange = 3;
  final int maxFliesOnScreen = 7;
  int currentInterval;
  int nextSpawn;

  FlySpawner(this.game) {
    start();
    game.spawnFly();
  }

  void start() {
    killAll();
    currentInterval = maxSpawnInterval;
    nextSpawn = DateTime.now().millisecondsSinceEpoch + currentInterval;
  }

  void killAll() {
    game.flies.forEach((Fly fly) => fly.isDead = true);
  }

  void update(double t) {
    int nowTimestamp = DateTime.now().millisecondsSinceEpoch;

    int livingFlies = 0;
    game.flies.forEach((Fly fly) {
      if (!fly.isDead) livingFlies += 1;
    });

    if (nowTimestamp >= nextSpawn && livingFlies < maxFliesOnScreen) {
      game.spawnFly();
      if (currentInterval > minSpawnInterval) {
        currentInterval -= intervalChange;
        currentInterval -= (currentInterval * .02).toInt();
      }
      nextSpawn = nowTimestamp + currentInterval;
    }
  }
}
Integrating the controller to the game class
To integrate the spawn controller into our game class, the first step is to remove the old calls to the spawnFly method.
In ./lib/langaw-game.dart remove the following line inside the initialize method:
spawnFly();
Then in ./lib/components/fly.dart remove this line inside the onTapDown handler:
game.spawnFly();
That should take care of the technical bug discussed above.
Back in ./lib/langaw-game.dart, we create an instance of the spawn controller and store it in an instance variable. The following process should feel like it’s becoming an S.O.P. now.
First we import the class:
import 'package:langaw/controllers/spawner.dart';
Then we create an instance variable:
FlySpawner spawner;
Inside the initialize method, we create the instance and store it into the instance variable. Add the following line after the screen is determined:
spawner = FlySpawner(this);
Finally, inside the update method:
spawner.update(t);
The difference between using components and controllers in the game loop is that the main method we call is update. This is because rendering graphics is not part of most controllers’ purpose.
The last piece of the puzzle that we have to put in is calling spawner’s start method.
Open up ./lib/components/start-button.dart and put the following code inside the onTapDown handler:
game.spawner.start();
Time to test the game!
Let’s run our game and test tapping on the start button and losing. You should now have game with a complete game play cycle: as in start playing, lose, and then play again (not to be confused with the game loop).
View the code at this step on GitHub.
Step 4. Dialog Boxes
We’re making progress with our game. Now we need to help the user understand the game and how to play it. We should also put in some credits.
We do this using dialog boxes.
Behind the scenes, dialog boxes are just views.
Starting with the buttons
We need to create two button components and position them on the bottom of the screen. One on the left side and the other on the right side.
Create the following components:
./lib/components/help-button.dart
import 'dart:ui';
import 'package:flame/sprite.dart';
import 'package:langaw/langaw-game.dart';
import 'package:langaw/view.dart';

class HelpButton {
  final LangawGame game;
  Rect rect;
  Sprite sprite;

  HelpButton(this.game) {
    rect = Rect.fromLTWH(
      game.tileSize * .25,
      game.screenSize.height - (game.tileSize * 1.25),
      game.tileSize,
      game.tileSize,
    );
    sprite = Sprite('ui/icon-help.png');
  }

  void render(Canvas c) {
    sprite.renderRect(c, rect);
  }

  void onTapDown() {
    game.activeView = View.help;
  }
}
./lib/components/credits-button.dart
import 'dart:ui';
import 'package:flame/sprite.dart';
import 'package:langaw/langaw-game.dart';
import 'package:langaw/view.dart';

class CreditsButton {
  final LangawGame game;
  Rect rect;
  Sprite sprite;

  CreditsButton(this.game) {
    rect = Rect.fromLTWH(
      game.screenSize.width - (game.tileSize * 1.25),
      game.screenSize.height - (game.tileSize * 1.25),
      game.tileSize,
      game.tileSize,
    );
    sprite = Sprite('ui/icon-credits.png');
  }

  void render(Canvas c) {
    sprite.renderRect(c, rect);
  }

  void onTapDown() {
    game.activeView = View.credits;
  }
}
Breakdown: Once again, the components we just defined should be pretty standard now. The thing to notice here is how we define the Rects for each of the buttons.
We want the help button to be on the lower left of the screen, that’s why the Left is set to game.tileSize * .25 (a quarter of a tile size) from the left edge of the screen. It’s Top is set to the screen height minus game.tileSize * 1.25 (one and one fourth of the tile size). This should position the bottom of the button exactly a quarter of a tile from the bottom of the screen.
The credits button uses the same calculation for the Top and Left parameters. Except the value for Left uses the width of the screen, positioning the button on the bottom right of the screen.
Both buttons are one square tile in size.
Another thing to note here is the onTapDown handler. Once those handlers are called, the value of the game class’ activeView property is set to the correct value. View.help for the help dialog box and View.credits for the credits dialog box.
We now need to add these buttons to the game class (./lib/langaw-game.dart) by importing both button class files:
import 'package:langaw/components/credits-button.dart';
import 'package:langaw/components/help-button.dart';
Then create the instance variables:
HelpButton helpButton;
CreditsButton creditsButton;
Inside the initialize method, we create an instance of the help and credits buttons and store them in the instance variables we just created:
helpButton = HelpButton(this);
creditsButton = CreditsButton(this);
We need to render these buttons so put the following lines of code inside the render method. This has to be put inside the if block that check if the activeView is set to either View.home or View.lost (just above or below rendering the start button).
helpButton.render(canvas);
creditsButton.render(canvas);
Finally we attach a handler for the onTapDown handlers by putting the following block of code inside the onTapDown handler of the game class.
// help button
if (!isHandled && helpButton.rect.contains(d.globalPosition)) {
  if (activeView == View.home || activeView == View.lost) {
    helpButton.onTapDown();
    isHandled = true;
  }
}

// credits button
if (!isHandled && creditsButton.rect.contains(d.globalPosition)) {
  if (activeView == View.home || activeView == View.lost) {
    creditsButton.onTapDown();
    isHandled = true;
  }
}
Breakdown: The comments (lines starting with //) are not necessary, it just keeps the code clean, easy to read, and easy to maintain. The code is similar to the code for the start button.
It checks for three conditions:
- The tap must not be handled yet
!isHandled. - The tap is inside the button’s
rectproperty. - The
activeViewmust be set to eitherView.helporView.credits
Once those conditions are met, we call the onTapDown handler of the button and flip the value of isHandled to true to notify the next handlers that this tap is already handled.
If you run the game now, you should see something that looks like this screenshot:
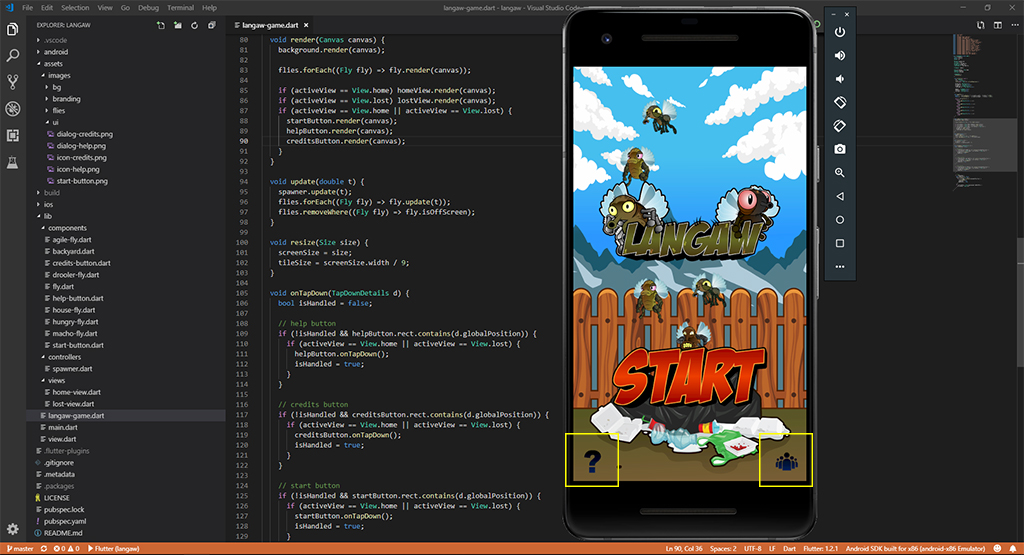
Clicking on those buttons should take you to the corresponding views which right now shows nothing.
The dialog boxes
To show the dialog boxes, we’ll use an approach similar to the home and the “you lost” views.
Create the following views:
./lib/views/help-view.dart
import 'dart:ui';
import 'package:flame/sprite.dart';
import 'package:langaw/langaw-game.dart';

class HelpView {
  final LangawGame game;
  Rect rect;
  Sprite sprite;

  HelpView(this.game) {
    rect = Rect.fromLTWH(
      game.tileSize * .5,
      (game.screenSize.height / 2) - (game.tileSize * 6),
      game.tileSize * 8,
      game.tileSize * 12,
    );
    sprite = Sprite('ui/dialog-help.png');
  }

  void render(Canvas c) {
    sprite.renderRect(c, rect);
  }
}
./lib/views/credits-view.dart
import 'dart:ui';
import 'package:flame/sprite.dart';
import 'package:langaw/langaw-game.dart';

class CreditsView {
  final LangawGame game;
  Rect rect;
  Sprite sprite;

  CreditsView(this.game) {
    rect = Rect.fromLTWH(
      game.tileSize * .5,
      (game.screenSize.height / 2) - (game.tileSize * 6),
      game.tileSize * 8,
      game.tileSize * 12,
    );
    sprite = Sprite('ui/dialog-credits.png');
  }

  void render(Canvas c) {
    sprite.renderRect(c, rect);
  }
}
Breakdown: As you can see this code is very similar to the other views we’ve defined in the beginning of this part.
Both the dialog boxes are 8 by 12 tiles in size. So to center the dialog box, we set the parameter for Left to half of a tile. For the Top parameter, we take half of the screen height and subtract half of the dialog box from it.
We’re almost done with this part, we just need to add the views into the game class. Using the same process, first we import the view files:
import 'package:langaw/views/help-view.dart';
import 'package:langaw/views/credits-view.dart';
Then we create instance variables that will hold our views:
HelpView helpView;
CreditsView creditsView;
Inside the initialize method, we create instances of our new views and store them in the instance variables.
helpView = HelpView(this);
creditsView = CreditsView(this);
Then inside the render method, add the following lines of code. Remember that the order of rendering is based on the order the code is written. So put these lines at the end as dialog boxes should be on top:
if (activeView == View.help) helpView.render(canvas);
if (activeView == View.credits) creditsView.render(canvas);
Inside the onTapDown handler, we check if the tap is not yet handled, and then if we are inside the help view or credits view. If we are, we set the view to home and flip the isHandled variable to true, preventing the subsequent handlers to execute.
if (!isHandled) {
  if (activeView == View.help || activeView == View.credits) {
    activeView = View.home;
    isHandled = true;
  }
}
Our game class file is now too long for a screenshot, so here’s a “text screenshot”. Your file ./lib/langaw-game.dart should look like this:
import 'dart:math';
import 'dart:ui';
import 'package:flame/flame.dart';
import 'package:flame/game.dart';
import 'package:flutter/gestures.dart';
import 'package:langaw/components/agile-fly.dart';
import 'package:langaw/components/backyard.dart';
import 'package:langaw/components/credits-button.dart';
import 'package:langaw/components/drooler-fly.dart';
import 'package:langaw/components/fly.dart';
import 'package:langaw/components/help-button.dart';
import 'package:langaw/components/house-fly.dart';
import 'package:langaw/components/hungry-fly.dart';
import 'package:langaw/components/macho-fly.dart';
import 'package:langaw/components/start-button.dart';
import 'package:langaw/controllers/spawner.dart';
import 'package:langaw/view.dart';
import 'package:langaw/views/credits-view.dart';
import 'package:langaw/views/help-view.dart';
import 'package:langaw/views/home-view.dart';
import 'package:langaw/views/lost-view.dart';

class LangawGame extends Game {
  Size screenSize;
  double tileSize;
  Random rnd;

  Backyard background;
  List<Fly> flies;
  StartButton startButton;
  HelpButton helpButton;
  CreditsButton creditsButton;

  FlySpawner spawner;

  View activeView = View.home;
  HomeView homeView;
  LostView lostView;
  HelpView helpView;
  CreditsView creditsView;

  LangawGame() {
    initialize();
  }

  void initialize() async {
    rnd = Random();
    flies = List<Fly>();
    resize(await Flame.util.initialDimensions());

    background = Backyard(this);
    startButton = StartButton(this);
    helpButton = HelpButton(this);
    creditsButton = CreditsButton(this);

    spawner = FlySpawner(this);
    homeView = HomeView(this);
    lostView = LostView(this);
    helpView = HelpView(this);
    creditsView = CreditsView(this);
  }

  void spawnFly() {
    double x = rnd.nextDouble() * (screenSize.width - (tileSize * 2.025));
    double y = rnd.nextDouble() * (screenSize.height - (tileSize * 2.025));

    switch (rnd.nextInt(5)) {
      case 0:
        flies.add(HouseFly(this, x, y));
        break;
      case 1:
        flies.add(DroolerFly(this, x, y));
        break;
      case 2:
        flies.add(AgileFly(this, x, y));
        break;
      case 3:
        flies.add(MachoFly(this, x, y));
        break;
      case 4:
        flies.add(HungryFly(this, x, y));
        break;
    }
  }

  void render(Canvas canvas) {
    background.render(canvas);

    flies.forEach((Fly fly) => fly.render(canvas));

    if (activeView == View.home) homeView.render(canvas);
    if (activeView == View.lost) lostView.render(canvas);
    if (activeView == View.home || activeView == View.lost) {
      startButton.render(canvas);
      helpButton.render(canvas);
      creditsButton.render(canvas);
    }
    if (activeView == View.help) helpView.render(canvas);
    if (activeView == View.credits) creditsView.render(canvas);
  }

  void update(double t) {
    spawner.update(t);
    flies.forEach((Fly fly) => fly.update(t));
    flies.removeWhere((Fly fly) => fly.isOffScreen);
  }

  void resize(Size size) {
    screenSize = size;
    tileSize = screenSize.width / 9;
  }

  void onTapDown(TapDownDetails d) {
    bool isHandled = false;

    // dialog boxes
    if (!isHandled) {
      if (activeView == View.help || activeView == View.credits) {
        activeView = View.home;
        isHandled = true;
      }
    }

    // help button
    if (!isHandled && helpButton.rect.contains(d.globalPosition)) {
      if (activeView == View.home || activeView == View.lost) {
        helpButton.onTapDown();
        isHandled = true;
      }
    }

    // credits button
    if (!isHandled && creditsButton.rect.contains(d.globalPosition)) {
      if (activeView == View.home || activeView == View.lost) {
        creditsButton.onTapDown();
        isHandled = true;
      }
    }

    // start button
    if (!isHandled && startButton.rect.contains(d.globalPosition)) {
      if (activeView == View.home || activeView == View.lost) {
        startButton.onTapDown();
        isHandled = true;
      }
    }

    // flies
    if (!isHandled) {
      bool didHitAFly = false;
      flies.forEach((Fly fly) {
        if (fly.flyRect.contains(d.globalPosition)) {
          fly.onTapDown();
          isHandled = true;
          didHitAFly = true;
        }
      });
      if (activeView == View.playing && !didHitAFly) {
        activeView = View.lost;
      }
    }
  }
}
View the code at this step on GitHub.
Time for a test-drive!
Here’s a demo video of what we have so far. If you’ve been following properly, you should have something that looks the same.
Conclusion
After yet another lengthy tutorial, we’ve progressed with our game and took a few steps towards it becoming a “finished game”.
Before starting this tutorial, I honestly thought this was going to be a quick one. I was wrong.
Well, I hope you’ve learned a thing or two about game development during this part. But most importantly, I hope you enjoyed this one.
Feel free to drop a question in the comments section below if you have any. You can also send me an email or join my Discord channel.
What’s next
In the next part, we’ll deal with something new. Something we haven’t yet touched.
Music and sound.
We’ll also add a scoring mechanism, a simple twist regarding the gameplay, and of course some sort of logic for storing the highest score.
I hope to see you there!